Users sign up and Row Level Security - Supabase Database tutorial

Sandro Maglione
Get in touch with meWeb development
23 November 2022[updated]
•10 min read
Sandro Maglione
Web development
Implementing authentication is complex and tedious. Supabase can help! In this post we are going to learn how to setup a complete end-to-end authentication system for your app.
We are going to learn how to:
- 🪄 Sign up a user using the Supabase SDK
- 🗂 Create a SQL table to store the user information
- 🔗 Connect together Supabase Auth and Supabase Database to register our users' information
- 🔐 Setup Row Level Security to protect the access to the database
At the end, you will have a complete and secure authentication system, without the need to implement everything on your own 🚀.
Overview - How sign up works using Supabase
The following diagram shows what we are going to implement:
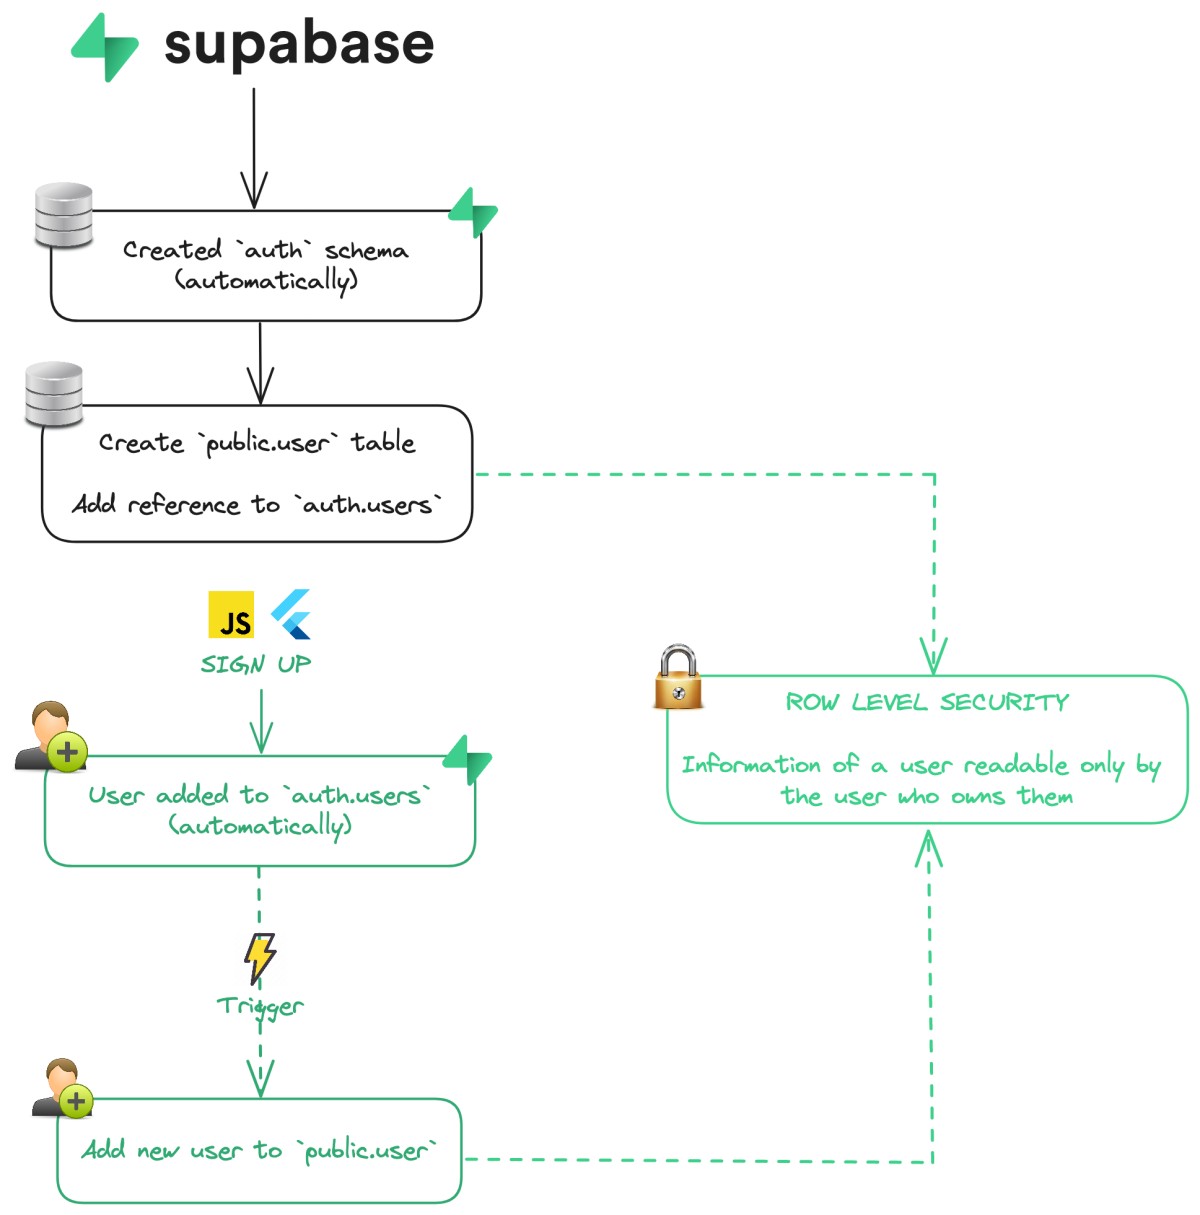
What we are going to do is the following:
- Create the
public.usertable, with a reference toauth.users(automatically created by Supabase) - Create a
triggerto insert new user insidepublic.userafter a successful sign up - Setup Row Level Security for
public.user
Signing up is a matter of a few lines of code using Supabase.
You can read Flutter Supabase Authentication - Complete tutorial to learn the details of how to implement authentication with Supabase
The Supabase SDK provides a simple signUp: you just need to collect the user information (email and password) and call the signUp method.
Note: Supabase also provides sign up using many different providers (Google, Facebook, Github, and others)
// Sign up using the javascript SDK
const { data, error } = await supabase.auth.signUp({
  email: 'example@email.com',
  password: 'example-password',
})
// Sign up using the Flutter SDK
final AuthResponse res = await supabase.auth.signUp(
email: 'example@email.com',
password: 'example-password',
);Connect authentication and database
After calling signUp successfully, you will see a new user registered in the authentication dashboard of your Supabase project.
Under the hood, every Supabase project comes with an auth schema already pre-configured:
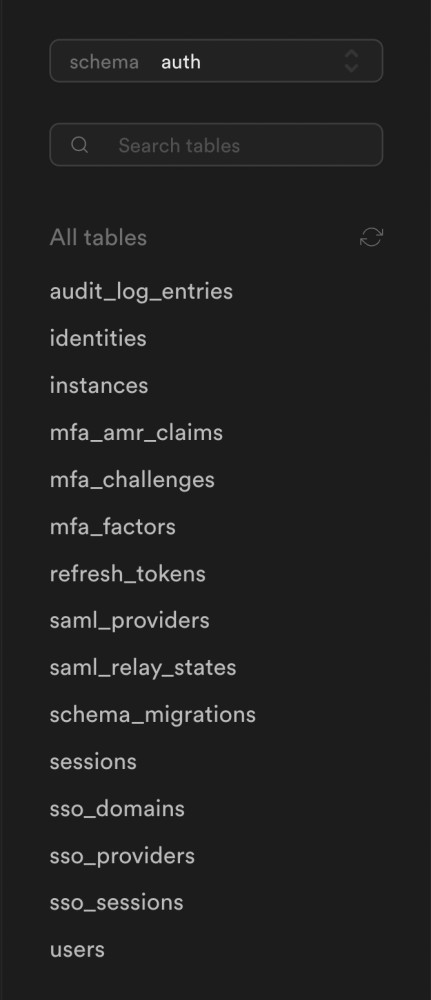
This schema has a users table. This table is used to store the information of a user after authentication (after calling signUp). The Supabase Authentication SDK does this automatically after a successful sign up.
We now want to have a new table inside the public schema containing the information about the user that we want to store for our own application.
The
publicschema is where we create all the tables specific for our project.publicis automatically created and empty when you start a new Supabase project.
These are the steps that we are going to discuss in more details in this article:
- Create a
public.usertable that contains all the information of the user - Reference (foreign key) the
auth.userstable from thepublic.user - Create a trigger to insert a new row inside
public.userafter a successful sign up - Setup Row Level Security, using policies, to limit the access to private information about the user
Create table to store user profile
The first step is to create our own user table inside the public schema.
The
auth.userstable is used internally by Supabase, so it's recommended to not change its structure and instead create a reference inside thepublicschema.
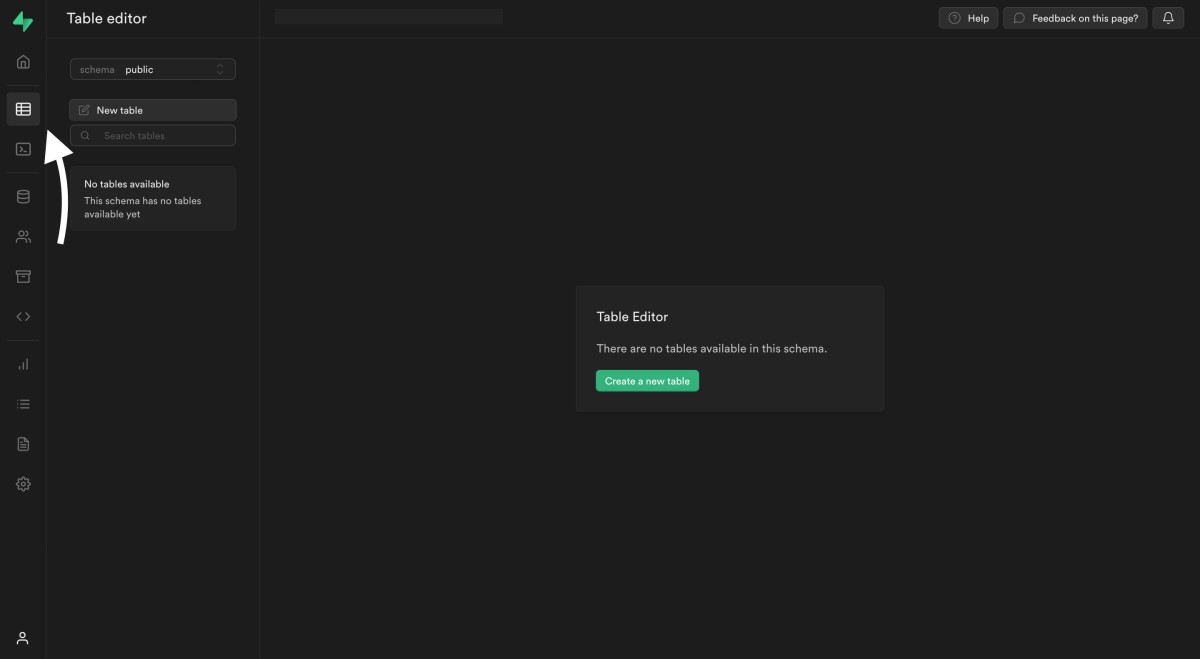
We can use the Supabase dashboard to achieve this in a few easy steps.
First open your Supabase project. You can access the database dashboard from the menu on the left.
Click on "Create table". Add the name of the table (user) and an id column of type uuid as primary key. The other columns are the information about the user that you want to store for your specific project:
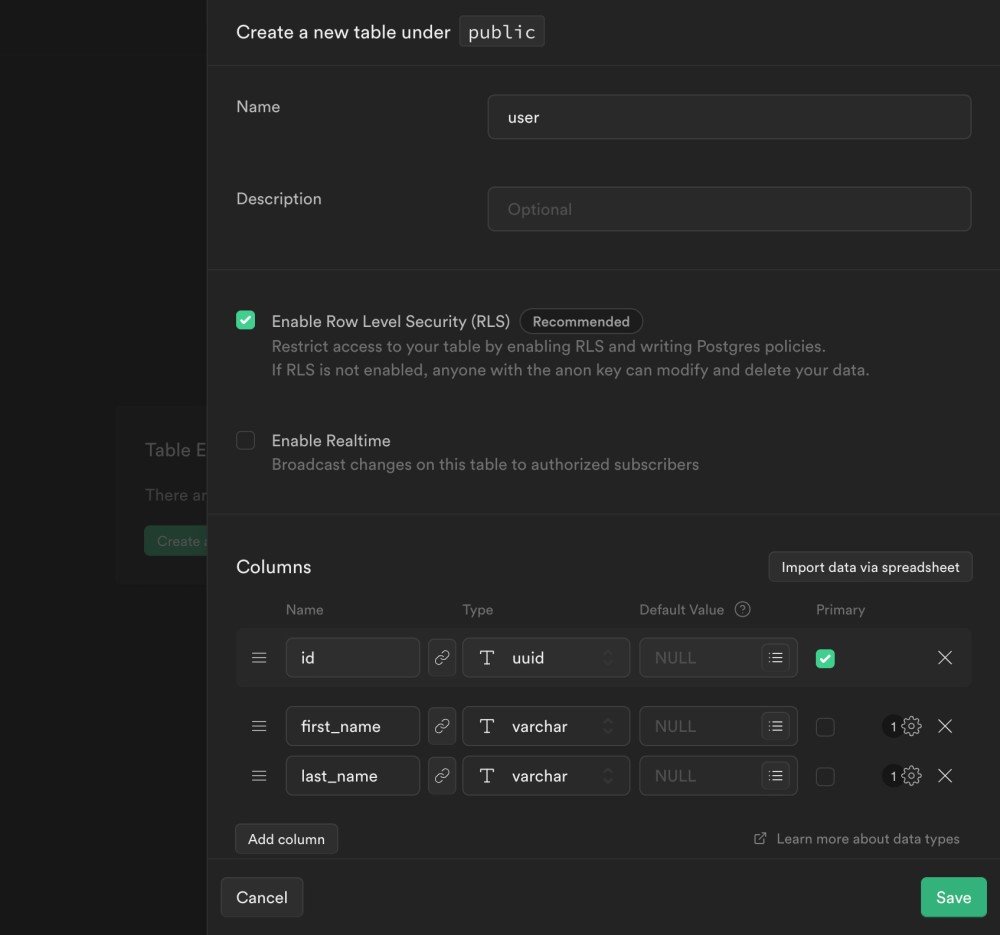
The most important step is to add a reference (foreign key) to the auth.users table. Click on the link button on the id column and select the users table's id column:
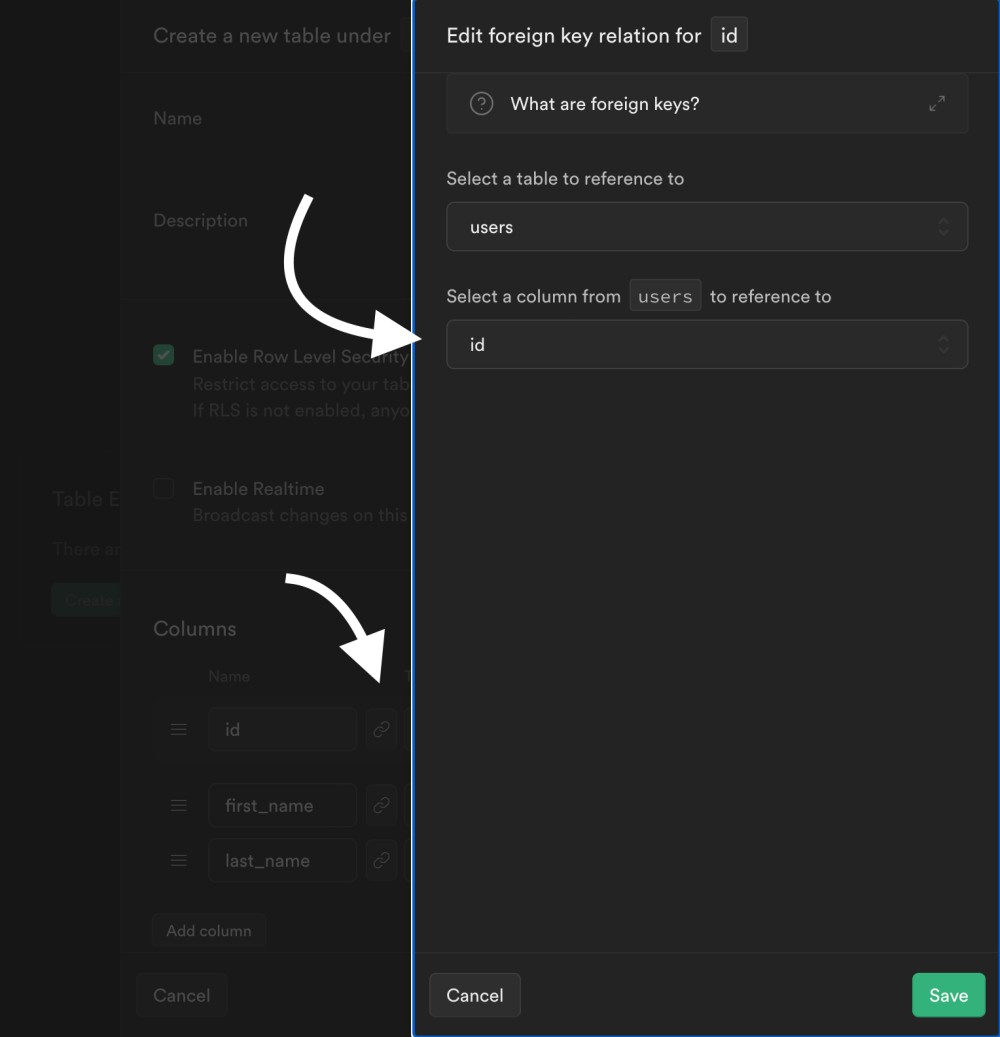
Now you will see the link button highlighted: the reference has been created. Finally, click on Save to create the table:
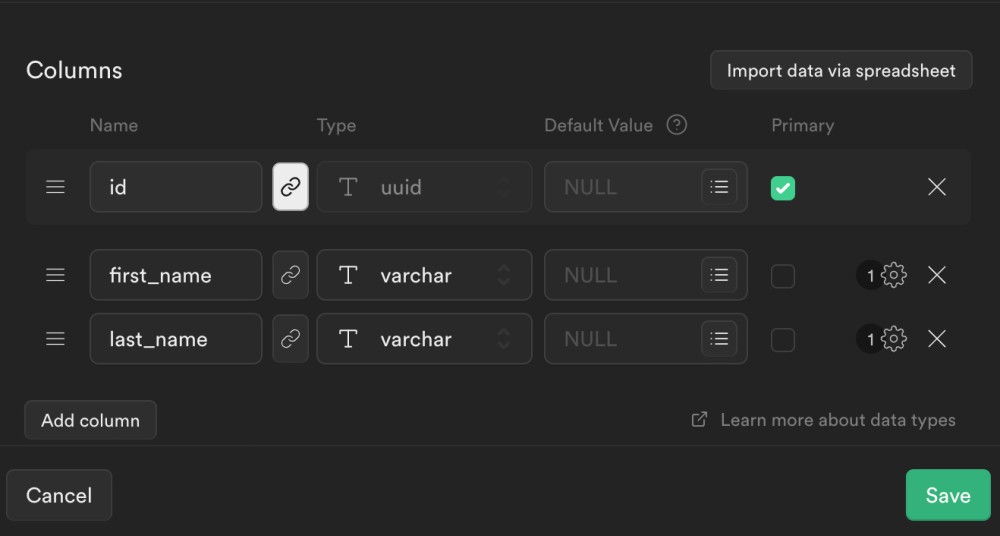
The Supabase dashboard allows you to create a table using an easy visual editor. The same result can be achieved by running a create table query directly, similar to the following:
create table public.user (
  id uuid references auth.users not null,
  first_name varchar(255),
  last_name varchar(255),

  primary key (id)
);
Create a user after a sign up
The next step is actually adding a new row inside the public.user table after a sign up.
In order to achieve this we are going to create an SQL function which returns a trigger.
This function will be called every time a new row is added to auth.users and it will insert a new row inside public.user (using a trigger).
We are going to use the SQL editor inside the Supabase dashboard. First, access the editor from the menu on the left:
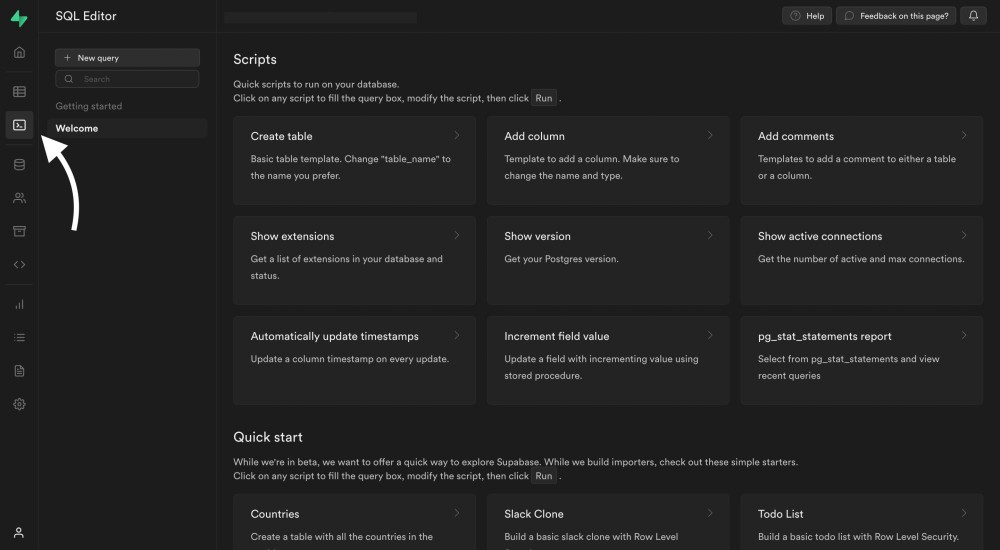
Click on "New query".
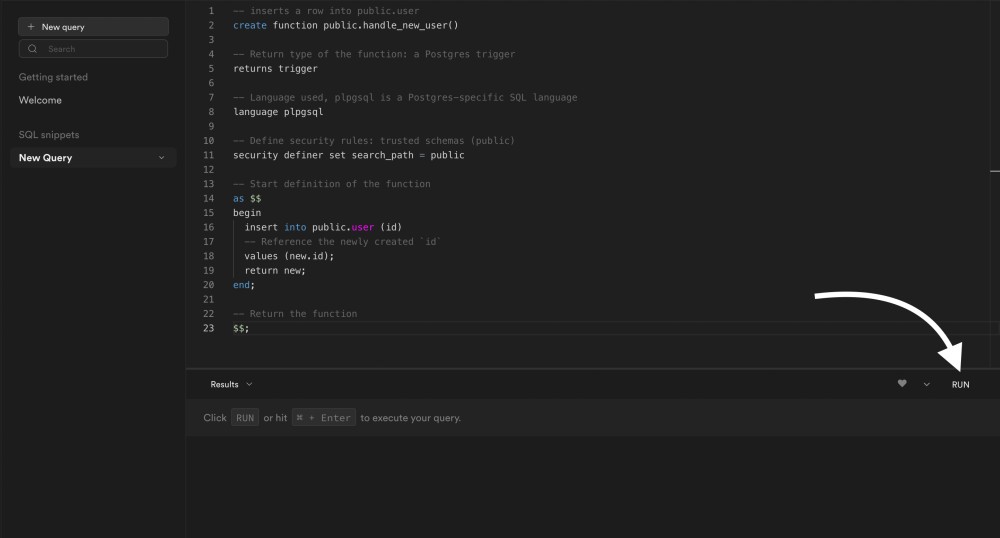
Define an SQL function which inserts a new row inside user every time a new user signs up:
-- Inserts a row into public.user
create function public.handle_new_user()

-- Return type of the function: a Postgres trigger
returns trigger

-- Language used, plpgsql is a Postgres-specific SQL language
language plpgsql

-- Define security rules: trusted schemas (public)
security definer set search_path = public

-- Start definition of the function
as $$
begin
  insert into public.user (id)
  -- Reference the newly created `id`
  values (new.id);
  return new;
end;

-- Return the function
$$;
Read more about how to create a function in Postgres here
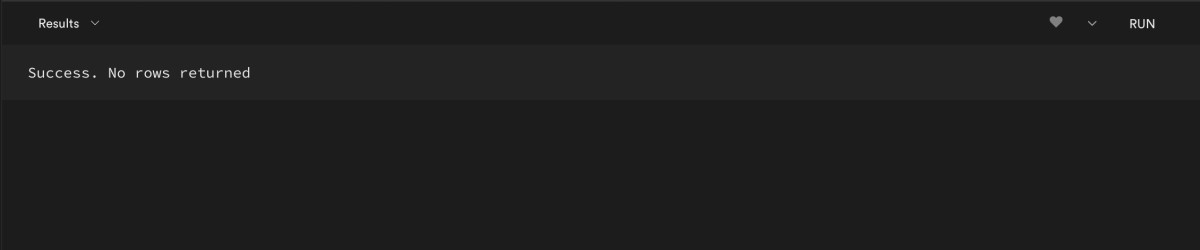
Finally, click on Run to execute the query:
You will see a message Success. No rows returned: this means that the query was executed successfully.
You can read more about security and
search_pathhere
Define trigger to insert new user
The last step is defining an SQL trigger which reacts to an every insert inside auth.users and calls the function we just created.
A trigger, as the name suggests, is a way to listen to any event in SQL and execute some code before or after this event occurs.
The trigger will listen for an insert event in auth.users and call the handle_new_user function we defined previously.
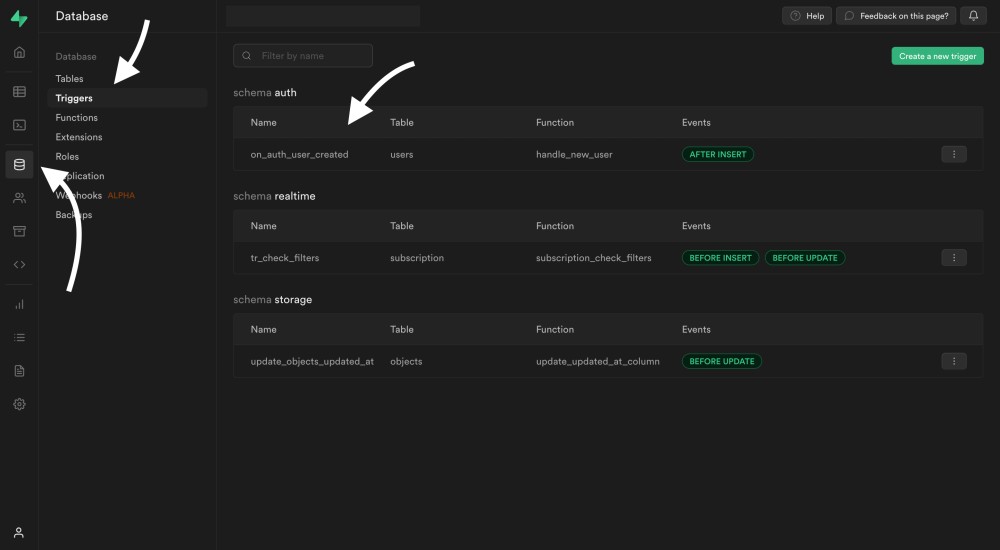
Use again the SQL editor in the Supabase dashboard, click on "Create query", paste and run the code below:
-- Trigger the function every time a user is created
create trigger on_auth_user_created

  -- New sign up: insert in `auth.users`
  after insert on auth.users

  -- Call `handle_new_user` function
  for each row execute procedure public.handle_new_user();
You can check that everything executed correctly directly inside the Supabase dashboard. From the menu on the left you can access the database information. Under Triggers you should see your newly created on_auth_user_created trigger:
Enable Row Level Security
The very final step is to enable Row Level Security and define some policy to allow the user to read his own information.
Row Level Security allows to automatically add a
WHEREcheck to every request. In this case, the information of a user should be readable only by the user who owns them.
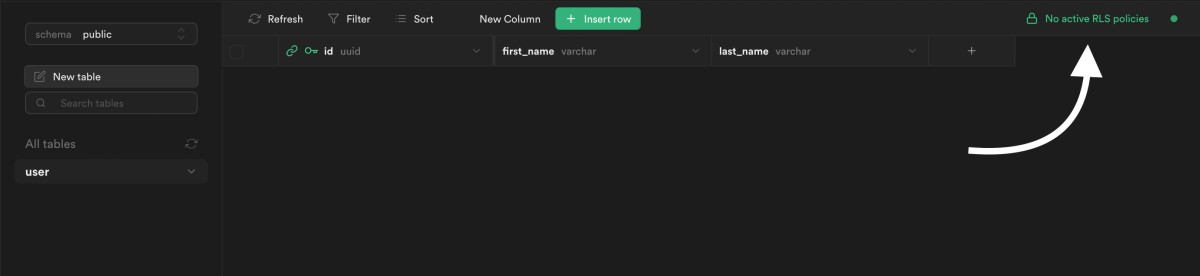
We already enabled Row Level Security when we initially created the public.user table:
Row Level Security is enabled, but we don't have any policy yet that allows to read and write in the table:
If Row Level Security was not enabled, you can run the following query:
alter table public.user enable row level security;Since Row Level Security is enabled, this table is accessible via the API but no data will be returned unless we set up some
policy.
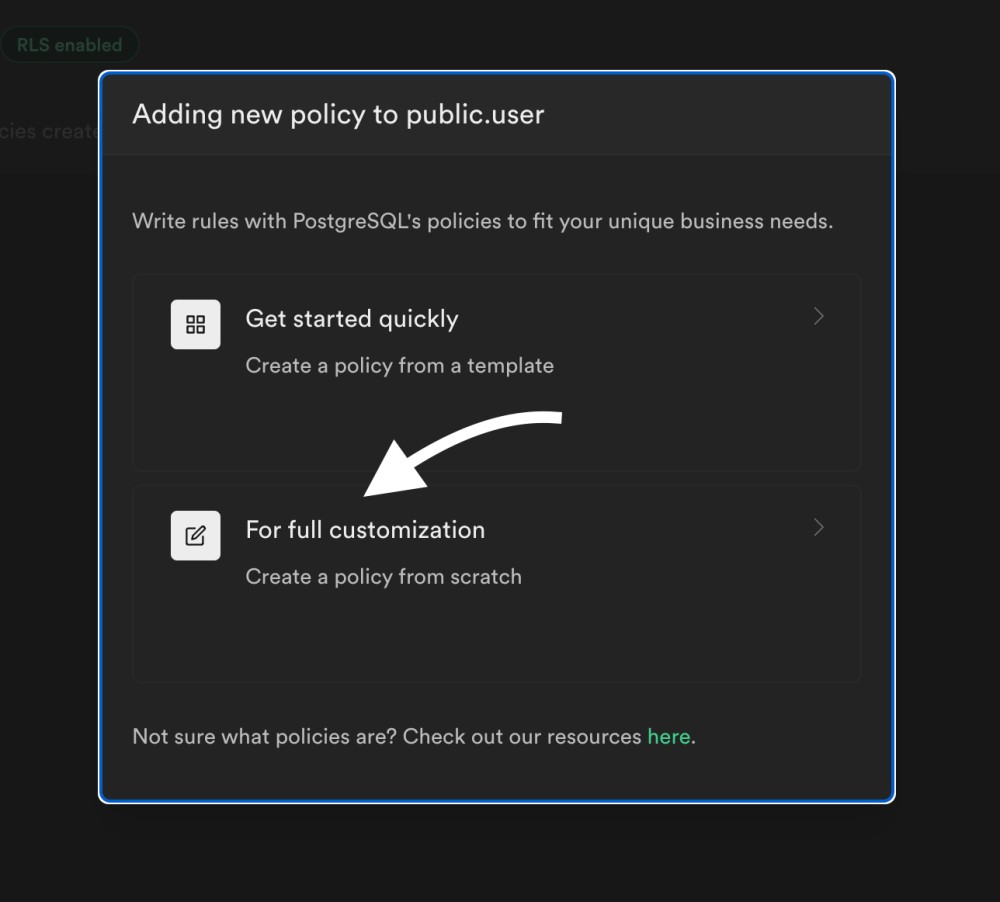
We can create them directly inside the Supabase dashboard. You can access the policies editor from the menu of the left:
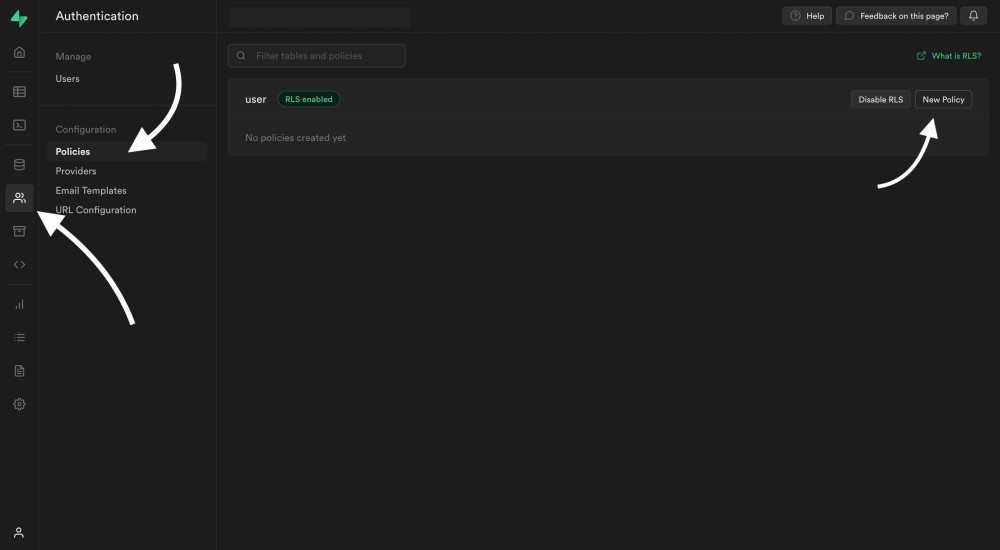
Click on "Create policy", and then select full customization:
Let's now define a policy that only allows to insert inside public.user if the id matches the authentication id:
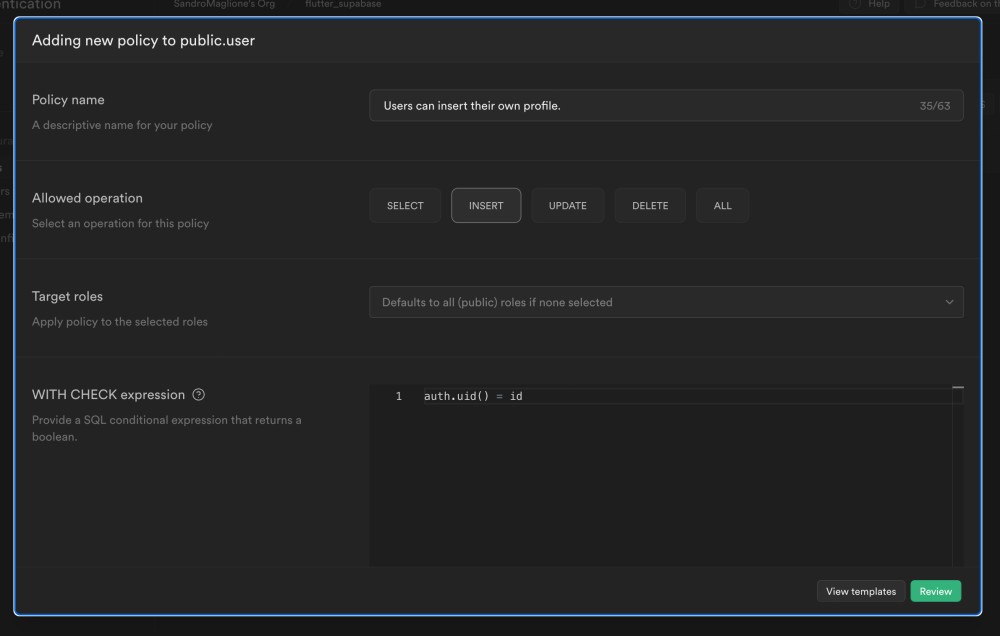
Here,
auth.uid()is an helper function provided by Supabase which returns the ID of the user making the request. The policies make sure that a user can view and change only a row that references his own ID.
Click on Review and then Create policy to complete the creation:
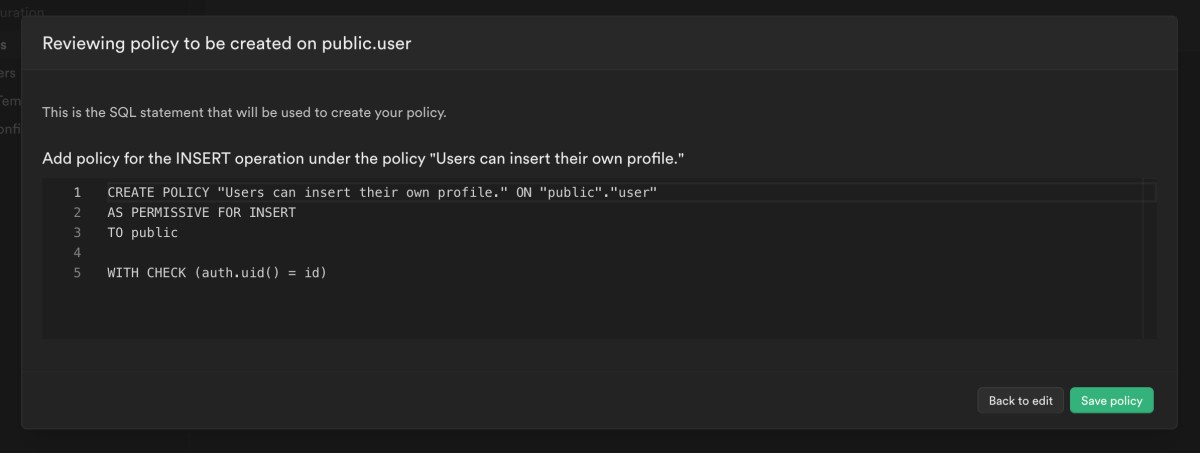
This corresponds to running the query below in the SQL editor:
CREATE POLICY "Users can insert their own profile." ON "public"."user"
AS PERMISSIVE FOR INSERT
TO public

WITH CHECK (auth.uid() = id)

-- Or also this
create policy "Users can insert their own profile."
  on "user" for insert
  with check ( auth.uid() = id );
You can now view the created policy directly inside the dashboard:

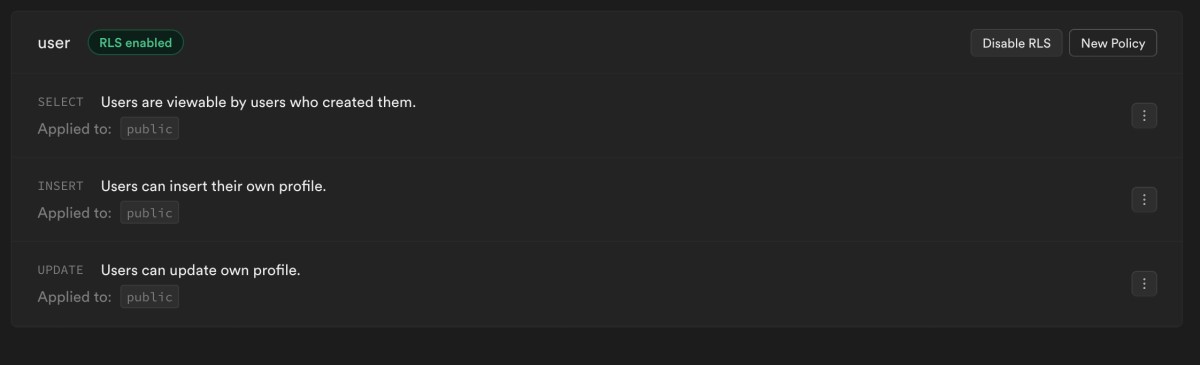
We can then create other policies (select, update):
-- Same policy created above
create policy "Users can insert their own profile."
  on "user" for insert
  with check ( auth.uid() = id );

create policy "Users are viewable by users who created them."
  on "user" for select
  using ( auth.uid() = id );

create policy "Users can update own profile."
  on "user" for update
  using ( auth.uid() = id );
Finally, you can view all the policies created inside the dashboard:
This is all! You now have a complete end-to-end authentication system ready to be deployed!
Every time a new user signs up (using the super easy signUp method), the system will just work, and you will have a new user, fully secured, inside the user.public table, ready to start using your app!
The next step is to add more tables, use the Supabase Storage API, Edge Functions, and more!
You can subscribe to my newsletter here below to stay up to date with the latest releases, and more 🎉👇
Thanks for reading.