
Supabase is an open source Firebase alternative. Supabase makes super easy adding Authentication, Database, Storage, and more in your app.
In the previous article we learned how to setup a Flutter app with a complete Authentication system using Supabase.
In this post we are now going to add support for Supabase Database:
- Make
GETrequest to fetch the information of the logged user - Make
UPDATErequest to update the information of the user in the database
This post will explain step by step how to add the required configuration for Supabase database and how to use the supabase_flutter SDK to make any request to your database 🚀
This feature is built on top of the previous setup of Supabase Authentication and the configuration of the Supabase database with Row Level Security. Make sure to follow the previous two articles before reading this.
We are also going to use some best practices to structure the app to make it ready to scale to millions of users 🚀
Every method and class mentioned in this post has a link to the official API documentation for more details 📃
The final app is fully available Open Source on Github 👇
Overview of the app setup
This tutorial builds on top of the source code we implemented in the previous two articles:
- Flutter Supabase Authentication: we added authentication to our app, including sign up, sign in, and sign out
- Users sign up and Row Level Security: this part was all about setting up our database structure with a
usertable containingid,first_name, andlast_namefor all the registered users. Furthermore, we secured the access to the database by adding Row Level Security
What we are going to build next
In this article we are going to use the current setup to achieve the following:
- Read and display the information of the logged user: Based on the authenticated user
id, we are going to perform a request to fetch from theusertable - Update the user information: The user can write and update both his
first_nameandlast_namedirectly from the app
I report here below the shape of the user table we created in the previous article:
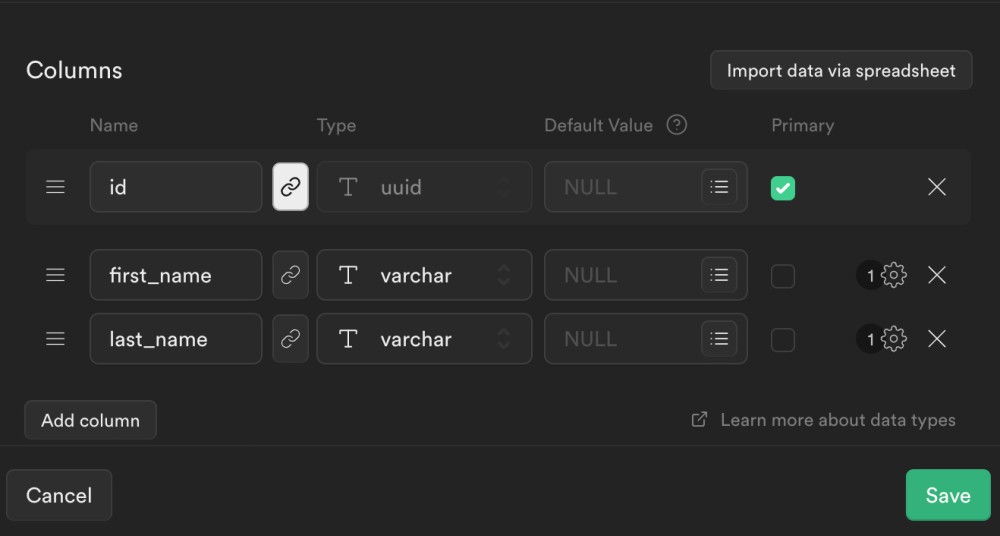
These requirements may look simple, but in reality they include most of the usecases for a general applications: reading and writing data from the database.
Let's jump into code 💻
Add new DatabaseRepository
The first step is adding a new repository class.
A repository defines all the methods required by the app to interact with the database.
We create a new UserDatabaseRepository, responsible to interact with the user table in our database.
Based on our requirements, we define 2 methods:
getUserInformation: used to get the information of a user from hisidupdateUserInformation: used to update the userfirst_nameandlast_name
abstract class UserDatabaseRepository {
  Future<UserModel> getUserInformation(String userId);
  Future<UserModel> updateUserInformation(UserModel userModel);
}
Adding serializable UserModel
The UserDatabaseRepository uses the UserModel class. The UserModel class maps our user table structure inside our app.
The
UserModelclass is needed to convert the response of the API from JSON to a dart class, usable inside the application code.
We create a new models folder. Inside it we add UserModel:
/// Convert database model for `user` table to
/// internal dart `class`:
/// - Use `fromJson` method to convert supabase response to [UserModel]
/// - Use `toJson` method to convert [UserModel] for update request
class UserModel {
  final String id;
  final String? firstName;
  final String? lastName;

  const UserModel({
    required this.id,
    this.firstName,
    this.lastName,
  });

  static UserModel fromJson(Map<String, dynamic> json) => UserModel(
        id: json['id'] as String,
        firstName: json['first_name'] as String?,
        lastName: json['last_name'] as String?,
      );

  Map<String, dynamic> toJson() => <String, dynamic>{
        'id': id,
        'first_name': firstName,
        'last_name': lastName,
      };
}
As you can see, UserModel is a simple class which defines 2 methods:
fromJson: used to convert the JSON response from the API to aUserModeltoJson: used to convert aUserModelto a JSON for the update request to the API
Database structure inside SupabaseTable class
Another utility class we are going to create is SupabaseTable.
This abstract class defines the shape of a table in the database directly inside our app:
/// Set of all the database tables in Supabase.
///
/// Used to reference valid tables when making database requests.
abstract class SupabaseTable {
  const SupabaseTable();
  String get tableName;
}
We are then going to define a concrete implementation of this class for the user table:
/// Set of all the database tables in Supabase.
///
/// Used to reference valid tables when making database requests.
abstract class SupabaseTable {
  const SupabaseTable();
  String get tableName;
}

class UserSupabaseTable implements SupabaseTable {
  const UserSupabaseTable();

  @override
  String get tableName => "user";

  String get idColumn => "id";
  String get idFirstName => "first_name";
  String get idLastName => "last_name";
}
By doing this, we avoid rewriting the name of the columns of the database manually in multiple places in the app. We are going to use this class inside our repository to safely reference columns in the database.
SupabaseDatabaseRepository implementation
We are now ready to define a concrete implementation for the UserDatabaseRepository:
class SupabaseDatabaseRepository implements UserDatabaseRepository {
  final Supabase _supabase;
  final UserSupabaseTable _userSupabaseTable;

  const SupabaseDatabaseRepository(this._supabase, this._userSupabaseTable);
}
The SupabaseDatabaseRepository takes an instance of Supabase and UserSupabaseTable as dependencies:
Supabase: supabase SDK, used to make requests to the databaseUserSupabaseTable: class we defined above, used to reference columns in theusertable
Use supabase_flutter SDK to make database requests
By implementing UserDatabaseRepository we are required to define the 2 methods of the repository: getUserInformation and updateUserInformation.
This is where we are going to use the Supabase SDK to make requests to the database.
The code is surprisingly simple 💁🏼♂️
For getUserInformation, we access client from _supabase and perform a select() request using an eq filter (equality) on the user id column.
We then convert the response to a UserModel using fromJson, and we return it:
@override
Future<UserModel> getUserInformation(String userId) async {
  final response = await _supabase.client
      .from(_userSupabaseTable.tableName)
      .select()
      .eq(_userSupabaseTable.idColumn, userId)
      .single();

  final userModel = UserModel.fromJson(response as Map<String, dynamic>);
  return userModel;
}
For updateUserInformation instead we are going to use the update method, passing the JSON of the given UserModel by using toJson:
@override
Future<UserModel> updateUserInformation(UserModel userModel) async {
  await _supabase.client
      .from(_userSupabaseTable.tableName)
      .update(userModel.toJson());
  return userModel;
}
This is all we need, Supabase will take care of the rest 🚀
You can read more about all the methods available in the Supabase SDK from the official documentation
Display and Update the user information
The very final step is using these methods inside our app.
This step is more related to your Flutter app structure than with Supabase itself. I report here below the 2 widgets you can find in the example.
The UserInformationText widget uses a FutureBuilder to perform the getUserInformation request and display the user information:
class UserInformationText extends StatelessWidget {
  final String userId;
  const UserInformationText({
    required this.userId,
    Key? key,
  }) : super(key: key);

  @override
  Widget build(BuildContext context) {
    return FutureBuilder<UserModel>(
      future: getIt<UserDatabaseRepository>().getUserInformation(userId),
      builder: (context, snapshot) {
        if (snapshot.connectionState == ConnectionState.waiting) {
          return const CircularProgressIndicator();
        } else if (snapshot.connectionState == ConnectionState.done) {
          final data = snapshot.data;
          if (data != null) {
            return Text(data.firstName ?? "No name");
          }

          return const Text("No found");
        }

        return const Text("Error");
      },
    );
  }
}
The UpdateUserForm widget instead allows the user to add a firstName and a lastName using TextField. It also displays an ElevatedButton that performs the updateUserInformation request when clicked:
class UpdateUserForm extends StatefulWidget {
  final String userId;
  const UpdateUserForm({
    required this.userId,
    Key? key,
  }) : super(key: key);

  @override
  State<UpdateUserForm> createState() => _UpdateUserFormState();
}

class _UpdateUserFormState extends State<UpdateUserForm> {
  String firstName = "";
  String lastName = "";

  @override
  Widget build(BuildContext context) {
    return Column(
      children: [
        TextField(
          onChanged: (value) => setState(() {
            firstName = value;
          }),
        ),
        TextField(
          onChanged: (value) => setState(() {
            lastName = value;
          }),
        ),
        ElevatedButton(
          onPressed: _onClickUpdateUser,
          child: const Text("Update"),
        ),
      ],
    );
  }

  Future<void> _onClickUpdateUser() async {
    try {
      await getIt<UserDatabaseRepository>().updateUserInformation(
        UserModel(
          id: widget.userId,
          firstName: firstName,
          lastName: lastName,
        ),
      );
    } catch (e) {
      // TODO: Show proper error to users
      print("Error when updating user information");
      print(e);
    }
  }
}
You can expand and update this widgets as you like. Supabase allows you to read and write data from the database, your Flutter app internally will then take these information and display them as you prefer 🎨
That's it! If you followed all the steps, you now have a Flutter application complete with a full Authentication system, a remote database fast and secure, and a powerful SDK to make any request to the database directly from your app.
This is all you need to start building your next project 🚀
If you are interest in learning more about flutter, dart, and Supabase you can subscribe to my newsletter here below 👇 and follow @SandroMaglione (me 👋) on Twitter.
Thanks for reading.