
Where do you start when implementing a Flutter app? 🤔
In this article we learn how to implement a complete Flutter app:
- Navigation (
go_router) - Data models (
equatable) - Local Database (
drift) - Dependency injection and error handling (
fpdart) - State management (
signals) - Screens and widgets
This article is an overview of all the basic features that you need to consider in most Flutter app and how to implement them 👇
Check daily activities @FlutterDev app ✅ 📦 Local sqlite database using `drift` ⚡️ State management using `signals` 🧬 Functional API using `fpdart`
Routing: go_router
I start from routing and navigation.
In this example I used go_router in combination with go_router_builder.
Using
go_router_builderallows to generate type-safe routes (with required and optional parameters)
All the pages are defined inside a single router.dart file:
part 'router.g.dart';

@TypedGoRoute<HomeRoute>(path: '/home')
class HomeRoute extends GoRouteData { /// 1️⃣
  const HomeRoute();

  @override
  Widget build(BuildContext context, GoRouterState state) => const HomeScreen();
}

@TypedGoRoute<TrackingRoute>(path: '/')
class TrackingRoute extends GoRouteData { /// 2️⃣
  const TrackingRoute();

  @override
  Widget build(BuildContext context, GoRouterState state) => const TrackingScreen();
}
This setup will generate 2 routes: HomeScreen and TrackingScreen. The pages are defined as normal Flutter widgets:
class HomeScreen extends StatelessWidget {
  const HomeScreen({super.key});

  @override
  Widget build(BuildContext context) {
    return Scaffold(
      body: SafeArea(
        child: Padding(
          padding: const EdgeInsets.only(left: 24, right: 24, top: 32),
          child: Column(
            children: [
              const InsertActivityForm(),
              const SizedBox(height: 24),
              Expanded(
                child: SingleChildScrollView(
                  child: Column(
                    children: [
                      StreamListener(
                        getIt.get<Database>().watchActivities,
                        builder: (context, data) => Column(
                          crossAxisAlignment: CrossAxisAlignment.stretch,
                          children: data
                              .map(
                                (activity) => ActivityCard(
                                  activity: activity,
                                ),
                              )
                              .toList(),
                        ),
                      ),
                    ],
                  ),
                ),
              ),
            ],
          ),
        ),
      ),
    );
  }
}
We can then navigate between routes using the go function generated by the builder:
class TrackingScreen extends StatelessWidget {
  const TrackingScreen({super.key});

  @override
  Widget build(BuildContext context) {
    return Scaffold(
      floatingActionButton: FloatingActionButton(
        onPressed: () => const HomeRoute().go(context),
        child: const Icon(Icons.add),
      ),
      /// ...
If you are interested in learning more about routing in Flutter you can read How to setup Routing in a Flutter app
Data models: equatable
Before displaying any widget or implement any business logic or state management we need to define the data models.
💡 Important: Make sure that all the information necessary to display and use the app are defined in your data models.
Dart offers many features to implement data models: enum, sealed, typedef, Records.
For example, I used enum to define an Emoji class that also overrides toString:
enum Emoji {
  smile,
  rocket,
  dart;

  @override
  String toString() => switch (this) {
        Emoji.smile => "😁",
        Emoji.rocket => "🚀",
        Emoji.dart => "🎯",
      };
}
I can then use this inside a normal class. I also use equatable to add a custom equality check to data models:
class ActivityModel extends Equatable {
  final int id;
  final String name;
  final Emoji emoji;

  const ActivityModel({
    required this.id,
    required this.name,
    required this.emoji,
  });

  @override
  List<Object?> get props => [id, name, emoji];
}
Sometimes a class is not necessary: you can use a simple typedef.
This has the advantage of being less verbose and it also supports value equality without using Equatable:
typedef Day = ({int day, int month, int year});You can use a typedef like any other type in other data models:
class EventModel extends Equatable {
  final int id;
  final int activityId;
  final Day createdAt;

  const EventModel({
    required this.id,
    required this.activityId,
    required this.createdAt,
  });

  @override
  List<Object?> get props => [id, activityId, createdAt];
}
There is more 🤩
Every week I dive headfirst into a topic, uncovering every hidden nook and shadow, to deliver you the most interesting insights
Not convinced? Well, let me tell you more about it
Local database: drift and sqlite
Most apps need a way to store and retrieve data.
In this example I used drift:
Drift is a reactive persistence library for Flutter and Dart, built on top of SQLite (
sqlite3)
Database tables
The first step is defining the table (SQL).
We map 1-1 the data models we defined previously.
By using @UseRowClass we can reference the models, drift will take care of converting between rows on the database and our models:
Every
Eventhas a reference to anActivity: we implement this requirement usingreferences(foreign key)
@UseRowClass(ActivityModel)
class Activity extends Table {
  IntColumn get id => integer().autoIncrement()();
  TextColumn get name => text()();
  TextColumn get emoji => text().map(EmojiConverter())();
}

@UseRowClass(EventModel)
class Event extends Table {
  IntColumn get id => integer().autoIncrement()();
  IntColumn get activityId => integer().references(Activity, #id)();
  TextColumn get createdAt => text().map(DayConverter())();
}
Converters
A drift table support only primitive data types. We therefore need to create custom converters for Emoji (enum) and Day (typedef).
drift provides a TypeConverter class. This requires to override fromSql and toSql, used to convert our custom type to a primitive type stored in the database:
class EmojiConverter extends TypeConverter<Emoji, String> {
  @override
  Emoji fromSql(String fromDb) => Emoji.values.firstWhere(
        (emoji) => emoji.toString() == fromDb,
        orElse: () => Emoji.dart,
      );

  @override
  String toSql(Emoji value) => value.toString();
}
For Day I defined a reusable extension for toSql and I implemented fromSql using Option from fpdart (functional programming):
extension OnDay on Day {
  String get toSql => "$day/$month/$year";
}

class DayConverter extends TypeConverter<Day, String> {
  @override
  Day fromSql(String fromDb) => Option<Day>.Do((_) {
        final split = fromDb.split("/");
        final day = _(
          Option.fromNullable(split.elementAtOrNull(0)).flatMap(
            (str) => str.toIntOption,
          ),
        );
        final month = _(
          Option.fromNullable(split.elementAtOrNull(1)).flatMap(
            (str) => str.toIntOption,
          ),
        );
        final year = _(
          Option.fromNullable(split.elementAtOrNull(2)).flatMap(
            (str) => str.toIntOption,
          ),
        );

        return (day: day, month: month, year: year);
      }).getOrElse(
        () => (day: 0, month: 0, year: 0),
      );

  @override
  String toSql(Day value) => value.toSql;
}
Database connection
The last step is creating a Database class that defines all the tables and opens the connection when created:
- Define tables using
@DriftDatabase - Call
superto run the logic to create aLazyDatabase(_openConnection())
@DriftDatabase(tables: [Activity, Event])
class Database extends _$Database {
  Database() : super(_openConnection());

  @override
  int get schemaVersion => 1;
}
_openConnection() defines the path where to store the sqlite database and returns a LazyDatabase:
LazyDatabase _openConnection() => LazyDatabase(
      () async {
        final dbFolder = await getApplicationDocumentsDirectory();
        final file = File(path.join(dbFolder.path, 'db.sqlite'));

        if (Platform.isAndroid) {
          await applyWorkaroundToOpenSqlite3OnOldAndroidVersions();
        }

        final cachebase = (await getTemporaryDirectory()).path;
        sqlite3.tempDirectory = cachebase;

        return NativeDatabase.createInBackground(file);
      },
    );
Database queries: Stream
With this we can now define the queries to select, insert, update, and delete the data.
drift provides dart methods for all the operations. For example, I used select on the generated activity table and watch() to return a Stream (in sync with added and removed values in the table):
@DriftDatabase(tables: [Activity, Event])
class Database extends _$Database {
  Database() : super(_openConnection());

  @override
  int get schemaVersion => 1;

  Stream<List<ActivityModel>> get watchActivities => select(activity).watch();
}
Functional API: fpdart
We now need a way to define API requests:
- Provide data to the API (from a user input for example)
- Validate the data and execute the logic, while also handling possible errors
We can do this using fpdart and functional programming.
In this example I added a query helper function inside Database. query allows to execute a query and catch errors using TaskEither.tryCatch:
If you are interested in learning more about
fpdartyou can read Getting started with fpdart and Functional programming in dart
@DriftDatabase(tables: [Activity, Event])
class Database extends _$Database {
  Database() : super(_openConnection());

  @override
  int get schemaVersion => 1;

  TaskEither<ApiError, Res> query<Res>(Future<Res> Function() execute) =>
      TaskEither.tryCatch(execute, QueryError.new);
}
Dependency injection and error handling: ReaderTaskEither
fpdart supports handling both dependencies and errors using the ReaderTaskEither type.
ReaderTaskEitherrequires 3 generic parameters:
- Dependency (
Database)- Error type (
ApiError)- Success return value (
int)
I defined an addActivity function that executes an insert query in the activity table:
ReaderTaskEither<Database, ApiError, int> addActivity({
  required String name,
  required Emoji emoji,
}) =>
    ReaderTaskEither.Do(
      (_) async {
        final db = await _(ReaderTaskEither.ask());

        return _(
          ReaderTaskEither.fromTaskEither(
            db.query(
              () => db.into(db.activity).insert(
                    ActivityCompanion.insert(
                      name: name,
                      emoji: emoji,
                    ),
                  ),
            ),
          ),
        );
      },
    );
All errors are defined as a sealed class:
By using
ReaderTaskEither(TaskEitherandEither) all errors are tracked internally byfpdart
sealed class ApiError {
  const ApiError();

  @override
  String toString() {
    return "Unexpected error!";
  }
}

class QueryError extends ApiError {
  final Object error;
  final StackTrace stackTrace;
  const QueryError(this.error, this.stackTrace);

  @override
  String toString() {
    return "Query error: $error";
  }
}
We can then define all the methods of the API in a similar way.
For example, we can add also a deleteEvent method that executes a delete query:
ReaderTaskEither<Database, ApiError, int> deleteEvent({
  required int eventId,
}) =>
    ReaderTaskEither.Do(
      (_) async {
        final db = await _(ReaderTaskEither.ask());

        return _(
          ReaderTaskEither.fromTaskEither(
            db.query(
              (db.delete(db.event)
                    ..where(
                      (table) => table.id.equals(eventId),
                    ))
                  .go,
            ),
          ),
        );
      },
    );
There is more 🤩
Every week I dive headfirst into a topic, uncovering every hidden nook and shadow, to deliver you the most interesting insights
Not convinced? Well, let me tell you more about it
State management: signals
The app allows the user to select a day and view all the events registered in that day:
class EventModel extends Equatable {
  final int id;
  final int activityId;
  final Day createdAt;

  const EventModel({
    required this.id,
    required this.activityId,
    required this.createdAt,
  });

  @override
  List<Object?> get props => [id, activityId, createdAt];
}
For state management I used signals:
- Define a
DaySignalclass that contains the app state usingsignal()(day selected) - Add a derived state using
computed() - Provide methods to update the state
class DaySignal {
  final _currentDayTime = signal(DateTime.now());
  late final _currentDay = computed<Day>(() {
    final dateTime = _currentDayTime();
    return (day: dateTime.day, month: dateTime.month, year: dateTime.year);
  });

  void previousDay() => _currentDayTime.value = _currentDayTime.value.subtract(
        const Duration(days: 1),
      );

  void nextDay() => _currentDayTime.value = _currentDayTime.value.add(
        const Duration(days: 1),
      );

  Day get day => _currentDay.value;
}
Service Locator: get_it
We then need to connect all the dependencies together.
I used get_it to manage the creation of concrete instances of Database and DaySignal (as lazy singletons):
final getIt = GetIt.instance;

void setup() {
  getIt.registerLazySingleton<Database>(() => Database());
  getIt.registerLazySingleton<DayController>(() => DaySignal());
}
Screens and widgets
With this we now have all the pieces in place to start working on the UI:
The UI is responsible to:
- Display the current state (retrieved from
Databaseas aStreamof data)- Display and update the selected day (state management using
signals)- Execute events on user actions (using the API methods defined with
fpdart)- Display the result of events (text messages, loading indicators, navigation)
The code below shows an example of how we can put everything that we implemented together in the final widget tree:
StreamListener: Custom widget used that usesStreamBuilderto react to changes from the databasewatchActivities: ReturnsStreamwithList<ActivityModel>from the database (Database)Watch: Allows to react to changes ofsignalDayController: Reads data usingsignal
StreamListener(
  getIt.get<Database>().watchActivities,
  builder: (context, data) => Expanded(
    child: GridView.count(
      crossAxisCount: 3,
      children: data
          .map(
            (activity) => Watch(
              (_) => CheckActivity(
                activityModel: activity,
                day: getIt.get<DayController>().day,
              ),
            ),
          )
          .toList(),
    ),
  ),
)class StreamListener<DataT> extends StatelessWidget {
final Stream<DataT> _stream;
final Widget Function(BuildContext context, DataT data) builder;
const StreamListener(this._stream, {required this.builder, super.key});
@override
Widget build(BuildContext context) {
return StreamBuilder(
stream: _stream,
builder: (context, snapshot) =>
switch ((snapshot.connectionState, snapshot.data)) {
(ConnectionState.none, _) => const CircularProgressIndicator(),
(ConnectionState.waiting, _) => const CircularProgressIndicator(),
(ConnectionState.done, _) => const Text("Completed"),
(ConnectionState.active, null) => const Text("Error: Missing data"),
(ConnectionState.active, final state?) => builder(context, state),
},
);
}
}We can then define functions to execute methods from the API and return a success or failure message to the user:
Future<void> onAdd(BuildContext context) =>
    addEvent(activityId: activityModel.id, day: day).match<void>(
      (apiError) {
        ScaffoldMessenger.of(context).showSnackBar(
          SnackBar(
            content: Text(
              "Error while adding new event for ${activityModel.name}: $apiError",
            ),
          ),
        );
      },
      (id) {
        print(id); /// Success ✅
      },
    ).run(getIt.get<Database>());
With these we now have a complete app:
- Routing and navigation
- Data storage
- API methods
- State management
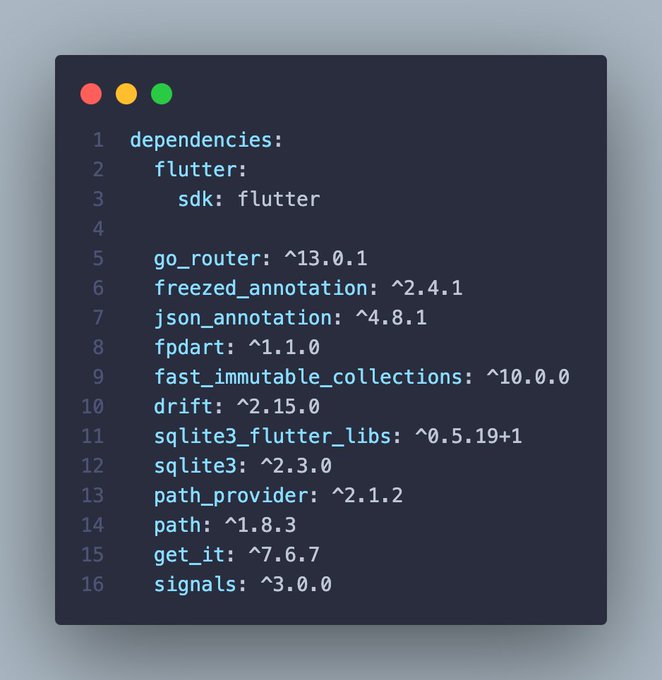
Flutter app in 2024 🚀 🧬 fpdart 🏗️ go_router (with go_router_builder) 🥶 freezed (with json_serializable) 📦 drift (sqlite3) 🔎 get_it ⚡️ signals 🧱 fast_immutable_collections
These are all features that you will found in most Flutter apps. We learned how to define them and connect them together to build a complete Flutter app 🚀
If you are interested to learn more, every week I publish a new open source project and share notes and lessons learned in my newsletter. You can subscribe here below 👇
Thanks for reading.