Animation in pixel art is a fun and interesting process of iterating over each frame to make the result look unique and enchanting.
In this post I show step by step the process of creating and animating your own pixel art character.
We are going to learn the general principles of animation and how to apply them for a set of common animations found in most games:
- Idle
- Walking
- Jumping
- Energy blast attack
- Climbing
For each of these we discuss step by step the animation process, the limitations of pixel art and how to overcome them, as well as some common strategies to make you animation stand out 👇
Character design
The first step is creating your character.
If you plan to animate the sprite it's important to consider the resolution and the granularity of the details (colors and shades).
More details means more complex animations, which will inevitably take more time and resources
Especially if you are an indie developer, you may not have the resources to animate a large character. This is why many indie game features characters at lower resolutions (between 8 and 32 pixels tall).
Remember ☝️: As you scale up the resolution (32x32, 64x64, 144x144 or even more) the time it takes grows exponentially:
- 16x16 = 256 pixels
- 32x32 = 1.024 pixels
- 144x144 = 20.736 pixels
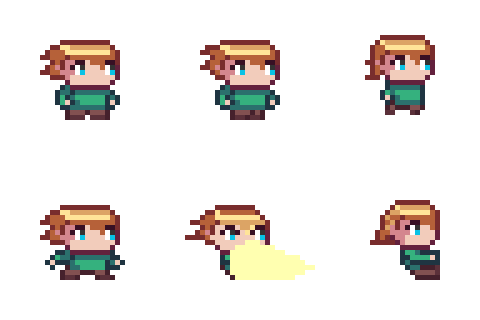
That's why our protagonist in this post has a resolution of 16x16:
These are some of the main features of our character:
- Big eyes (bigger compared to other 16x16 pixel characters)
- Light source coming directly from above
- Spiky hairs jutting out behind the head (important for animation ☝️)
- Colored outline
If you want to learn more on Pixel art techniques, styles, and principles you can read Getting started with Pixel Art - A beginner perspective
In this post we will explore some principles to animate our character in the following situations:
- Idle
- Walking
- Jumping
- Energy blast attack
- Climbing
For each animation we are going to discuss common strategies and limitations to make each animation unique 👇
There is more 🤩
Every week I dive headfirst into a topic, uncovering every hidden nook and shadow, to deliver you the most interesting insights
Not convinced? Well, let me tell you more about it
Idle animation
The first and generally easier animation is the idle pose.
An idle animation consists in a subtle movement even when the player is standing still.
The easiest and most common strategy for idle animations is moving the character up and down by some pixels.
In our example the 16x16 resolution does not allow for much movement. The idle animation therefore is composed of 4 frames:
- Stand still
- Body down 1 pixel (remove one row from the legs)
- Jutting hairs down 1 pixel
- Back to original standing position
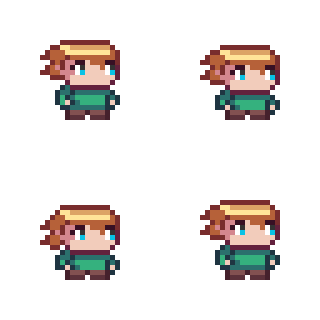
Step 3 is what gives personality to the character: use the hair to make the animations more interesting and realistic.
Leaving 1 frame delay between the body and hair movement makes it look like the hairs are floating, following the movement of the body.
Walking animation
Walking is probably the most common animation, found in the majority of 2D games (top-down and platformers).
A walking animation is composed of 4 main frames (often called key poses):
The idea is to alternate the movement of legs and arms back and forth:
- Foot touching the ground (frames 1 and 3)
- Legs and arms switching positions (frame 2 and 4): in these frames the whole body moves down 1 pixel
As long as those 4 frames are present, the animation will give the impression of a walking (or running) motion.
Our animation is composed of 6 frames. Adding 2 more frames to the main 4 makes the animation more fluid and interesting.
This is how it looks for our character:
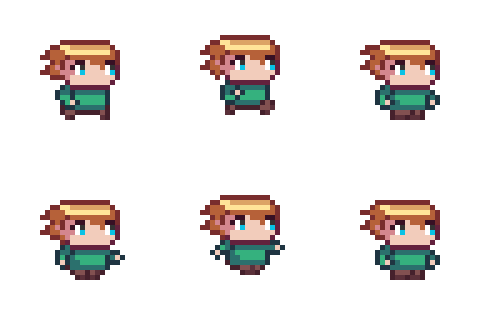
Here are some key details to highlight:
- The hairs are bouncing with a short delay after each step (similar to the idle animation)
- At each step the character moves up and down by 1 pixel
- Notice how the eyes are drawn to the single pink pixel of the hands
- This pink pixel has an higher contrast compared to the outline and body, which makes it stand out
- Keeping the position and color of this pixel consistent makes the movement of the whole body more realistic
- Since there is not much space for a full leg swing, the animation gives the impression of movement by mainly moving the legs horizontally
Changing the frame rate of the animation can make it look more like a running motion 🏃
Jumping animation
Another common animation in platformer games is jumping.
A jumping animation is usually more complex compared to walking.
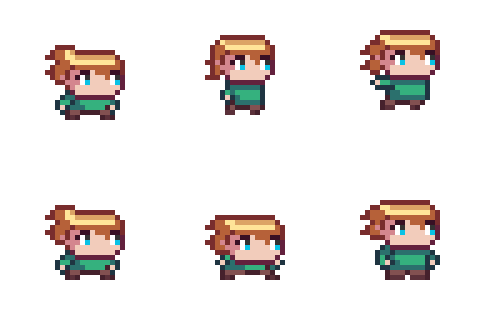
A jumping animation can be divided in 5 phases:
- Anticipation: Shows that the character is about to jump. It consists in a brief downward movement to prepare for the push to jump up.
- Going up: Shows the character moving up (
Y speed > 0). In this brief movement is common to squash the character to give more force to the movement.
- Invert: When the character reaches the higher point of the jump we show a slight movement to prepare for the fall.
- Fall: Shows the character falling. Adding an animation to clothes and hairs as they flap in the wind gives more personality to the animation.
- Contact: When the character hits the ground. It is common to squash the character to give more force to the impact.
All these principles come together in our character's jumping animation below, composed of 9 total frames:
There is more 🤩
Every week I dive headfirst into a topic, uncovering every hidden nook and shadow, to deliver you the most interesting insights
Not convinced? Well, let me tell you more about it
Energy blast attack animation
You can get creative with the actions for your own game as you start to grasp the general principles of animations.
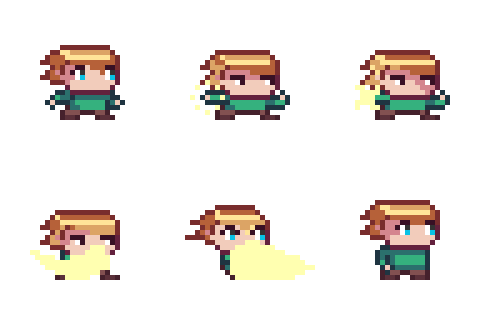
In this section we create an energy blast animation:
The character gathers some energy on his hand and then he blasts it toward the enemy.
This animation may be unique for a game, but the principles to apply to make it work are the same that we discussed above:
- Anticipation: In the first phase the character squats down and gathers the energy on his front hand. He also gets a more serious look, preparing to strike!
- Energy charge: In the second phase we show the energy gathering around the character hand as he prepares to blast.
The energy shines a bright light on the face, hair, and clothes of the character.
- Blast: After the charge the character quickly blasts the energy towards the enemy. In this brief phase we show the light shining on the character as the energy gets released. The characters is pushed up by 1 pixel as he opens wide his eyes with the blast. At the end of the animation the character comes back to a neutral pose.
The blasting movement should be as fast as possible (1/2 frames).
All together the final animation consists of 9 frames:
Climbing animation
The final animation we are going to discuss in this post is climbing.
This animation is different from all the others in some important aspects:
- The original standing pose cannot be used anymore, instead we need to design a new pose that shows the character from the side
- The small resolution requires to get creative and take care of the details that make the animation looks like a climbing movement
The first step is adapting our character to a climbing side perspective:
It is important to keep the distinctive features of the character when changing poses and perspective. In our example:
- Hairs jutting behind the head
- Big eyes
- Light source
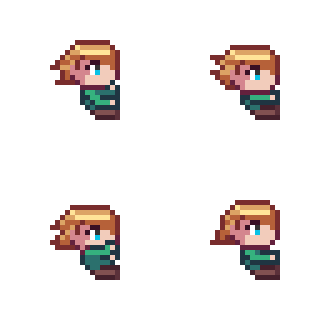
In a climbing motion you grab the wall with one hand and you push your whole body up to reach an higher spot with the opposite hand.
Therefore, the idea of the movement is conveyed by switching hands and legs up and down:
- In the first frame the front hand is down and the other is up
- The second frame shows the moment in which the hands switch positions as the character pushes up
- In the third frame the hands switched positions, with the front hand up and the other down
- The fourth and last frame has the same pose of the second frame, showing the hands switching positions
Since the legs of the sprite are too short to move up and down, the movement is expressed using only color shades
Notice how we are still animating the hairs bouncing as the character climbs up. The hair are one of the main features for all the animations of this character
The final animation of 4 frames looks like this:
That's it!

Below you can see the full sprite sheet for all the animations:
Feel free to use this animations for your own game or prototype if you want, it's free 👍
I plan to write more articles like this, where we discuss more examples of animations in pixel art. You can visit the Pixel Art section of the website to see the full list of all the articles on pixel art.
If you learned something new and enjoyed this post you can subscribe to my newsletter here below for staying up to date with future posts and for more exclusive content 👇
Thanks for reading.
