Collecting payments using Stripe Elements – Subscription with Supabase and Stripe Billing | Part 3

Sandro Maglione
Get in touch with meWeb development
25 July 2022[updated]
•6 min read
Sandro Maglione
Web development
In this series, we are going to learn how to implement a subscription system with Stripe and Supabase. We will use Supabase Authentication, Supabase Database, and Stripe Billing.
This guide is not intended to be a complete walkthrough of the code you need to write. It is instead an overview of the main steps and gotchas that I found in the process of learning how to set up the system. I will highlight the main API calls and give you access to external references and sources. It will be up to you to structure the system as you prefer and with any programming language of your choice.
Today we are learn about collecting payments using Stripe Elements.
Check out Part 2 of the Subscription with Supabase and Stripe Billing series.
Feel free to reach out if you need any clarification.
Recap of the previous episodes
This is our current situation (after Part 1 and Part 2).
At the end of part 1, we have signed up our user to both Supbase and Stripe. We did that using the simplicity of Supabase Authentication and Supabase Database. We then created a customer profile on Stripe for our new user.
At the end of part 2, we understood what Products and Prices are in Stripe. We also talked about a Webhook and why it is important. Finally, we created our first Product and Price from the Stripe dashboard.
We now have a user registered and signed in in our application. The next step is to make him pay!
Fetch Stripe Billing Products and Prices
The user is ready to subscribe. We are now ready to show him all the products and prices we offer.
We already created the products in the previous part of the guide. Now we have 2 options:
- Make a request to Stripe to fetch all the Products and relative Prices
- Store all the Products and Prices in a new Supabase table and fetch them from our database
Option 1 is easier. We simply create a new API endpoint in our application that returns the information that we need. Stripe provides a simple function to fetch all the products:
const products = await stripe.products.list({
  limit: 3,
});
Option 2 is more complex. Better sticking with Option 1.
Hint: How to store Products and Prices in Supabase Database
We will talk about it later in the guide. What we need is to listen for product.created, product.updated, and product.deleted on the Stripe Webhook (same for the prices). When we receive these events, we need to update our Supabase database.
Yep, it looks complex. Better to leave it for later.
Let the user choose the price
Now that we have the products and prices, we must implement a way for the user to choose the subscription he wants.
You can display the products in many different layouts based on the specific service you provide. I propose below some examples:

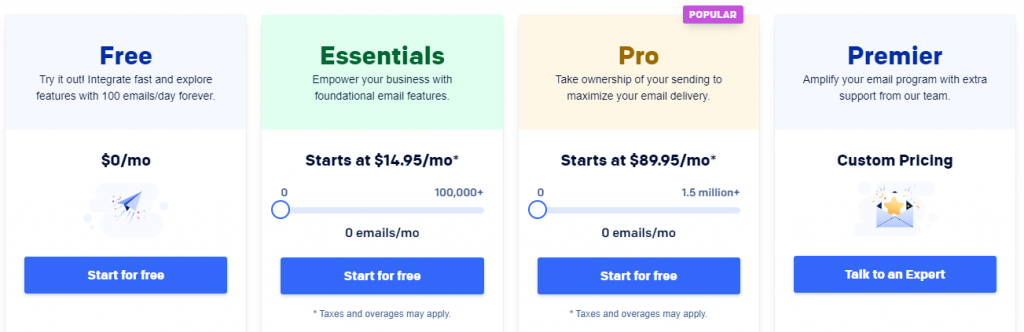
TailwindUI pricing page. Three simple choices, with the most relevant one highlighted at the center.
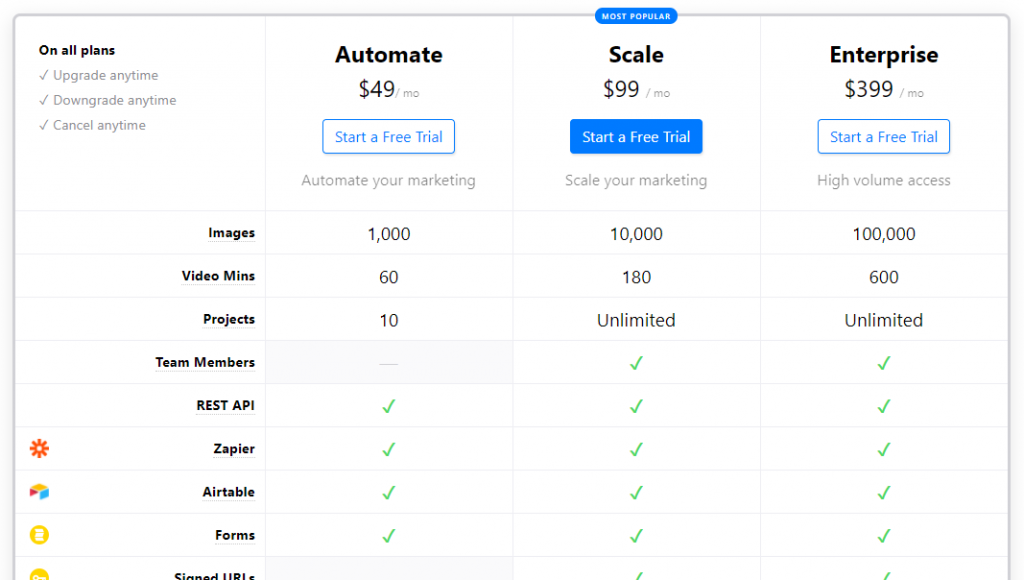
SendGrid pricing plans. The cost changes based on the usage of the service.
BannerBear pricing plans. Three products, one price for each. This is the most simple model, but it works pretty well.
Select the price id
The only information that our application needs at this step is the price_id choosen by the user.
Stripping the application down to its core, we only need one button for each price offered by our service. When the user clicks the button, the respective price is selected.
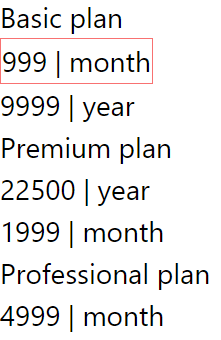
In this example, we have three products (Basic plan, Premium plan, Professional plan). Below each price, we have its respective prices. Click on a price to select it. That is all you need!
What we now have is a simple variable containing the price_id choosen by the user:
// A string store the price id selected by the user.
// I leave you to decide how to do state management and all that stuff.
const [priceId, setPriceId] = useState<string>();

// ...

<div>
  {product.prices.map((price) => (
    <div key={price.id}>
      <button
        type="button"
        onClick={() => setPriceId(price.id)}
        className={`${
          price.id === priceId ? 'border border-red-400' : ''
        }`}
      >
        {`${price.unit_amount} | ${price.interval}`}
      </button>
    </div>
  ))}
</div>
Collection payments using Stripe Elements
The other information that we need is the user full name and his card number.
We are going to use three libraries provided by Stripe (the example uses Typescript and React): stripe, @stripe/stripe-js, @stripe/react-stripe-js.
npm intall stripe @stripe/stripe-js @stripe/react-stripe-jsThe react-stripe-js library provides two hooks to use Stripe on the front end of your application: useStripe and useElements. It also provides a component called CardElement. How amazing, it is all ready and done!
We also need a text input to collect the user's full name.
import { CardElement, useStripe, useElements } from '@stripe/react-stripe-js';

// ...

const stripe = useStripe();
const elements = useElements();

// ...

<input
  type="text"
  id="fullname"
  placeholder="Full name"
  required
/>

<CardElement
  id="stripe-element"
  // You can style it too!
  options={{
    style: {
      base: {},
    },
    classes: {
      base: '',
      empty: '',
      focus: '',
      complete: '',
      invalid: '',
    },
  }}
/>

<button
  type="submit"
  disabled={!stripe || !elements}
>
  Pay
</button>
Collect the full name and the card number of the user.
Complete the Stripe Billing form with Stripe Elements
We now have all the required information to create a subscription for the user:
- The user's Full Name.
- The Card Number validated using Stripe Elements.
- The Price Id choosen by the user.
- The Customer Id of the current signed in user.
These are the minimum required information. You could ask more information to the user if you want.
Assuming you understood all the previous steps and were able to manage the state correctly in your app, we are ready to proceed to the interesting part, getting the money!
That is it for part 3. In the next part, we are going to create a subscription for the user and collect the money (while also handling all the possible errors in the payment process of course!).
In the meantime, check out other articles on my website, I think you will enjoy them. Or you can also join my newsletter here below.