Flutter Supabase Authentication - Complete tutorial

Sandro Maglione
Get in touch with meMobile development
28 September 2022
•13 min read
Sandro Maglione
Mobile development
Supabase is an open source Firebase alternative. Supabase makes super easy adding Authentication, Database, Storage, and more in your app.
Recently the version 1.0 of the supabase and supabase_flutter packages on pub.dev have been released (currently version v1.0.0-dev.9). This new major releases bring many improvements and features.
In my previous article Flutter Supabase Authentication we implemented authentication on a previous version of
supabase
In this article we are going to implement a production-ready app that uses Supabase v1.0 for Authentication. We are going to learn how to:
- Setup and initialize Supabase in our app (using environmental variables)
- Loading the current authentication state when the app launches, to log in the users immediately
- Implement a complete authentication system (sign up, sign in, sign out) using the latest Supabase features
- Using Supabase to listen for authentication state changes and sign in / sign out the user accordingly
We are also going to use some best practices to structure the app to make it ready to scale to millions of users 🚀
Every method and class mentioned in this post has a link to the official API documentation for more details 📃
The final app is fully available Open Source on Github 👇
App structure and pages
Before diving into the code, let's discuss how the app is organized.
The app will have the following pages:
- Splash screen: Initial page of the app, used to load the current authentication state and redirect the user to the correct page
- Sign in screen: If the user is not logged in, then we redirect to the sign in page
- Sign up screen: If the user does not have an account we provide a sign up page to create one
- Home page: When the user logs in we are going to display the home page of our app. In this page the user can then sign out from his account
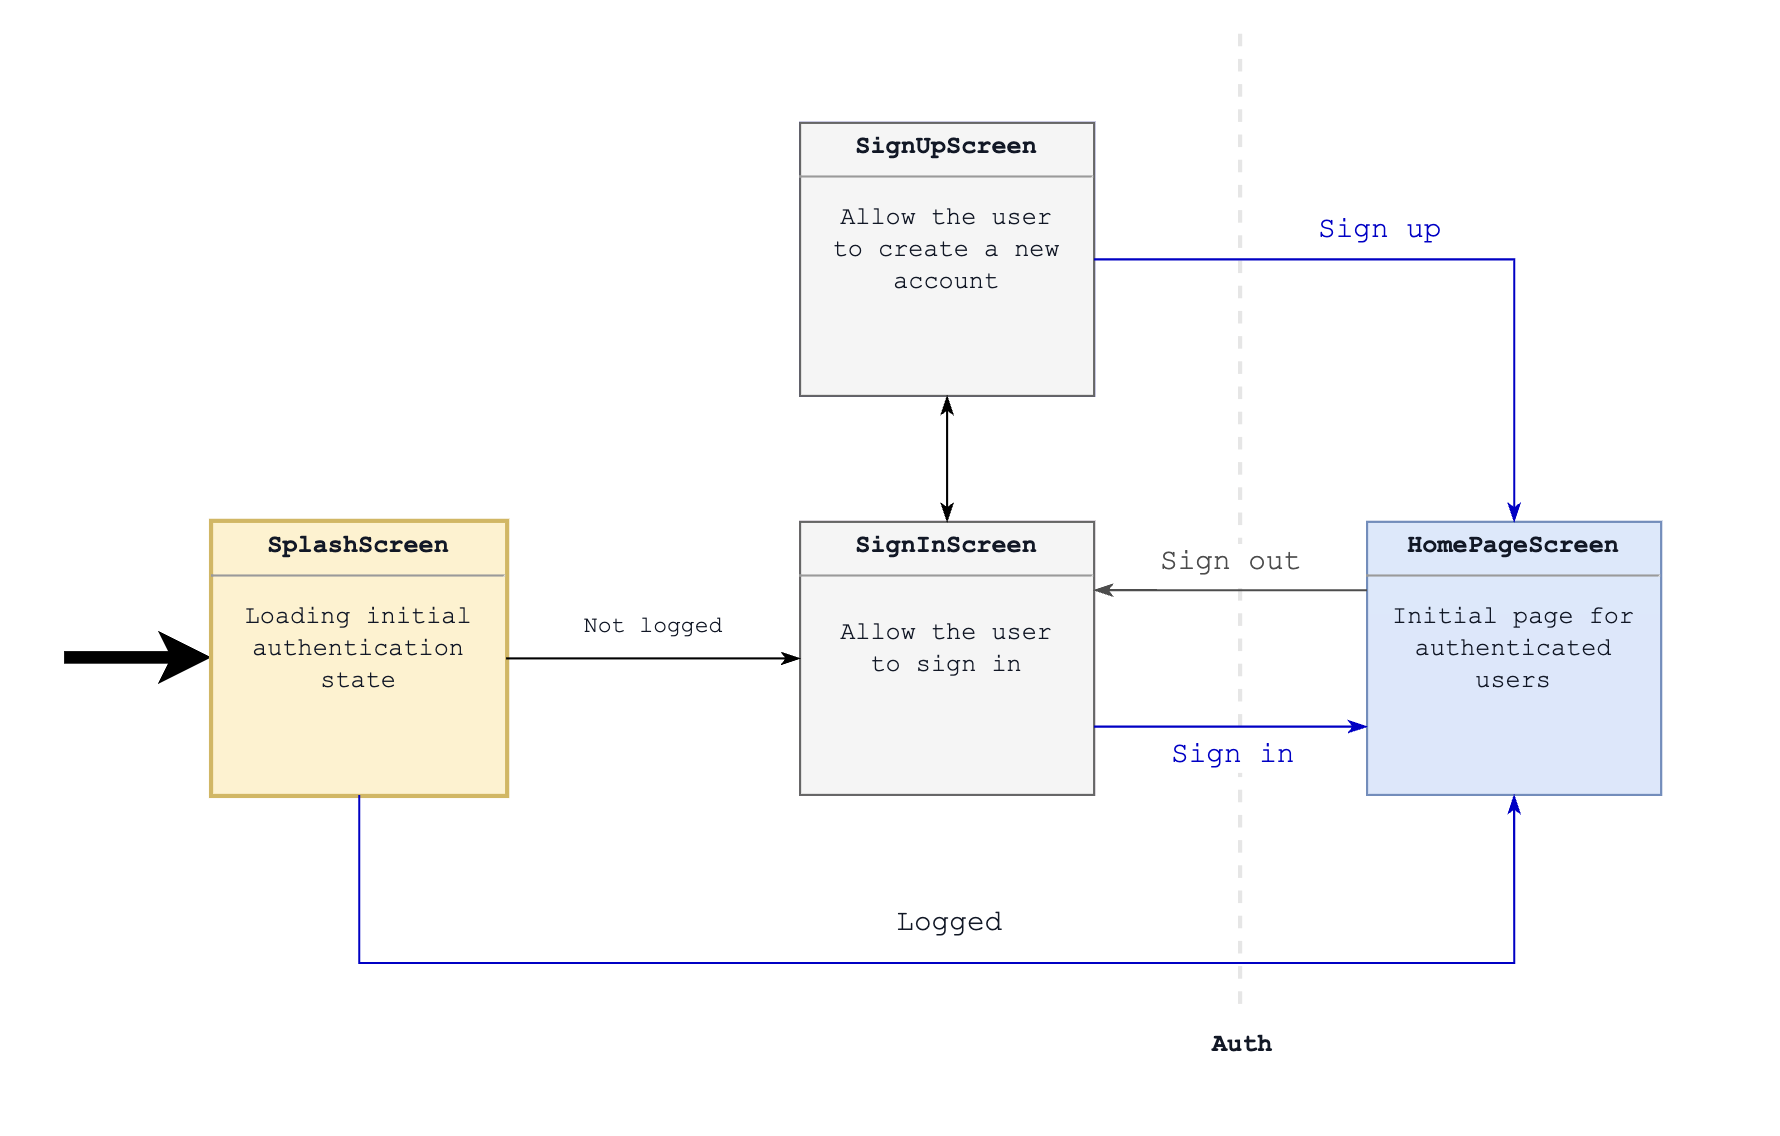
This is the basic setup for implementing a complete authentication system with sign in, sign up, and sign out.
You can see the complete flow in the video below:
- On initial load the user is not authenticated
- Navigate to sign up screen and create an account
- After the account is created, the user is signed in immediately. The session is maintained after a full reload
- Click sign out to exit from the account and remove the current session
- Sign in again using your credentials
App architecture
Furthermore, the app will use the following packages:
- auto_route: Used for implementing navigation (checkout out my article about Navigation in Flutter to learn more about
auto_routeand navigation) - injectable: Used to implement dependency injection (together with get_it, check out my article about Dependency Injection in Flutter for more details)
These package will make the configuration more solid and scalable.
Here below you can see the full pubspec.yaml file with all the dependencies:
name: flutter_supabase_complete
description: A new Flutter project.
publish_to: "none"

version: 1.0.0+1

environment:
  sdk: ">=2.17.6 <3.0.0"

dependencies:
  flutter:
    sdk: flutter

  supabase_flutter: ^1.0.0-dev.2

  # Routing
  auto_route: ^4.2.1

  # Dependency injection
  injectable: ^1.5.3
  get_it: ^7.2.0

dev_dependencies:
  flutter_test:
    sdk: flutter

  build_runner: ^2.2.0
  flutter_lints: ^2.0.0
  auto_route_generator: ^4.2.1
  injectable_generator: ^1.5.4

flutter:
Setup Supabase configuration
The first step is adding the required configuration to initialize Supabase.
Your first need to create a new project on supabase.com.
Once this is done, your project will have an URL and a Key (anonKey). These values are needed to connect your app with your Supabase project.
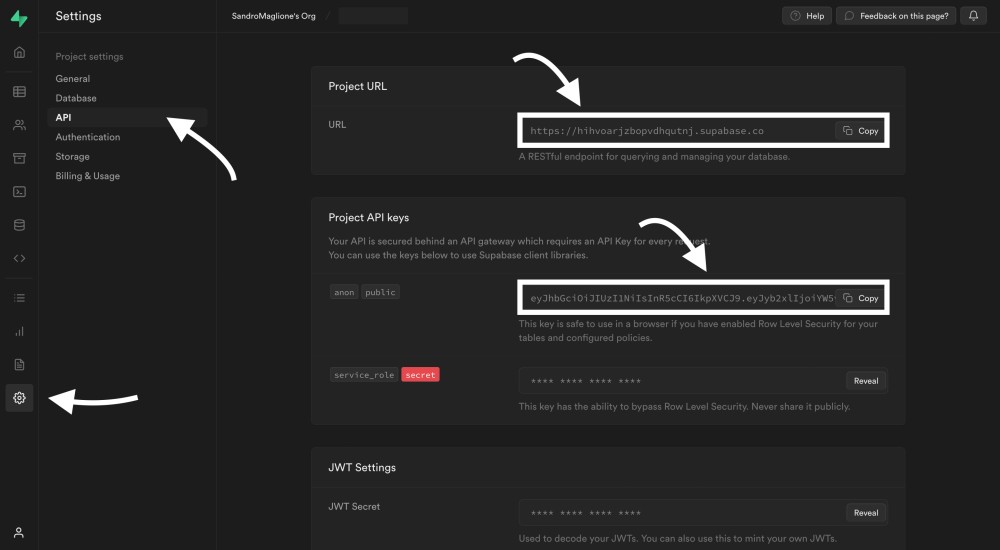
Environmental variables
We are going to provide the URL and Key to the app using Environmental Variables.
Check out my article about Environmental Variables to learn more about how to use them in your Flutter app
We are going to use --dart-define to pass the parameters to our app. Make sure to execute flutter run passing SUPABASE_URL and SUPABASE_ANNON_KEY:
flutter run lib/main.dart --dart-define=SUPABASE_URL=url --dart-define=SUPABASE_ANNON_KEY=keyWe then create a constants.dart file used to provide the variables to the app:
/// Environment variables and shared app constants.
abstract class Constants {
  static const String supabaseUrl = String.fromEnvironment(
    'SUPABASE_URL',
    defaultValue: '',
  );

  static const String supabaseAnnonKey = String.fromEnvironment(
    'SUPABASE_ANNON_KEY',
    defaultValue: '',
  );
}The String.fromEnvironment method will read the values defined using --dart-define and make them available for the app.
Note: We use an
abstract classto avoid creating an instance ofConstants. By then defining the constants asstatic constwe can access them usingConstants.supabaseUrlandConstants.supabaseAnnonKey.
Initialize Supabase in main.dart
Now the app as access to the required variables. We now need to pass them to Supabase to initialize the package.
Supabase provides a Supabase.initialize method that must be called before using the package in the app.
We add Supabase.initialize to main.dart before calling runApp. This method takes the url and anonKey parameters that we defined in the Constants class:
/// Shared `runApp` configuration.
///
/// Used to initialize all required dependencies, packages, and constants.
Future<void> mainCommon() async {
  WidgetsFlutterBinding.ensureInitialized();

  // Dependency injection (injectable)
  configureDependencies();

  await Supabase.initialize(
    url: Constants.supabaseUrl,
    anonKey: Constants.supabaseAnnonKey,
  );

  runApp(const App());
}Remember to call
WidgetsFlutterBinding.ensureInitialized()before initializing Supabase
There is more.
Every week I build a new open source project, with a new language or library, and teach you how I did it, what I learned, and how you can do the same. Join me and other 600+ readers.
Loading authentication state in splash screen
The first page we implement is the Splash screen.
This is the initial page of our app. This page will load the current authentication state and redirect to Sign in or Home page.
We are going to use a StatefulWidget. By doing this we have access to the initState method in which we check the authentication state.
Below you can see the full implementation:
import 'package:auto_route/auto_route.dart';
import 'package:flutter/material.dart';
import 'package:flutter_supabase_complete/core/routes/app_router.dart';
import 'package:supabase_flutter/supabase_flutter.dart';

/// Initial loading route of the app.
///
/// Used to load required information before starting the app (auth).
class SplashScreenPage extends StatefulWidget {
  const SplashScreenPage({Key? key}) : super(key: key);

  @override
  State<SplashScreenPage> createState() => _SplashScreenPageState();
}

class _SplashScreenPageState extends State<SplashScreenPage> {
  @override
  void initState() {
    super.initState();

    /// Load auth session.
    ///
    /// Wait a minium `delayed` time in any case
    /// to avoid flashing screen.
    Future.wait([
      SupabaseAuth.instance.initialSession,
      Future.delayed(
        const Duration(milliseconds: 2000),
      ),
    ]).then((responseList) {
      final session = responseList.first as Session?;

      /// Redirect to either home or sign in routes based on current session.
      context.router.replace(
        session != null ? const HomeRoute() : const SignInRoute(),
      );
    }).catchError((_) {
      context.router.replace(const SignInRoute());
    });
  }

  @override
  Widget build(BuildContext context) {
    return SafeArea(
      child: Scaffold(
        body: Center(
          child: Column(
            crossAxisAlignment: CrossAxisAlignment.center,
            mainAxisAlignment: MainAxisAlignment.center,
            children: const [
              CircularProgressIndicator(),
            ],
          ),
        ),
      ),
    );
  }
}The important code is highlighted below:
- Using
SupabaseAuth.instance.initialSessionwe get the current authentication state - If a
Sessionis found, then we redirect the user toHomeRoute - If a
Sessionis not found, then we redirect the user toSignInRoute - If an error occurs when checking for the current authentication state, then we simply consider the user as logged out and we redirect to
SignInRoute
/// Load auth session.
///
/// Wait a minium `delayed` time in any case
/// to avoid flashing screen.
Future.wait([
  SupabaseAuth.instance.initialSession,
  Future.delayed(
    const Duration(milliseconds: 2000),
  ),
]).then((responseList) {
  final session = responseList.first as Session?;

  /// Redirect to either home or sign in routes based on current session.
  context.router.replace(
    session != null ? const HomeRoute() : const SignInRoute(),
  );
}).catchError((_) {
  context.router.replace(const SignInRoute());
});Note: We use
Future.waitto wait at least 2 seconds before loading the app. This will avoid the flashing screen that occurs if callingSupabaseAuth.instance.initialSessionis instantaneous.
Authentication repository
In order to abstract the concrete implementation of our authentication, we are going to use the Repository Pattern.
We create an abstract class called AuthRepository. This class defines all the methods required for authentication in our app:
abstract class AuthRepository {
  Future<String> signInEmailAndPassword(String email, String password);
  Future<String> signUpEmailAndPassword(String email, String password);

  Future<void> signOut();
}We are going to make our concrete authentication class (SupabaseAuthRepository) implement AuthRepository:
class SupabaseAuthRepository implements AuthRepositoryThis pattern allows us to:
- Create different implementations of
AuthRepositorywhich can be all used for authentication. In this way, we can simply create a new class thatimplements AuthRepositoryand swap it - This creates a layer of abstraction between our domain logic (authentication) and the UI layer. The UI only knows about
AuthRepository, it does not know about which concrete implementation is being used
Supabase authentication implementation
We now need to implement the methods defined by AuthRepository: signInEmailAndPassword, signUpEmailAndPassword, and signOut.
I report here below the complete final code for SupabaseAuthRepository. We are now going to see each implementation one by one below:
import 'package:flutter_supabase_complete/app/repository/auth_repository.dart';
import 'package:injectable/injectable.dart';
import 'package:supabase_flutter/supabase_flutter.dart';

@Injectable(as: AuthRepository)
class SupabaseAuthRepository implements AuthRepository {
  final Supabase _supabase;
  const SupabaseAuthRepository(this._supabase);

  @override
  Future<String> signInEmailAndPassword(String email, String password) async {
    final response = await _supabase.client.auth.signIn(
      email: email,
      password: password,
    );

    final userId = response.user?.id;
    if (userId == null) {
      throw UnimplementedError();
    }

    return userId;
  }

  @override
  Future<String> signUpEmailAndPassword(String email, String password) async {
    final response = await _supabase.client.auth.signUp(email, password);

    final userId = response.user?.id;
    if (userId == null) {
      throw UnimplementedError();
    }

    return userId;
  }

  @override
  Future<void> signOut() async {
    await _supabase.client.auth.signOut();
    return;
  }
}Inject Supabase module
The first step is getting access to the Supabase class, which provides all the methods required for authentication.
The supabase package provides a Supabase.instance static method. This method allows to access the Supabase class, which is a Singleton.
As mentioned, we are going to use Dependency Injection. Therefore, instead of accessing Supabase.instance directly, we are going to make Supabase a required parameter for SupabaseAuthRepository:
class SupabaseAuthRepository implements AuthRepository {
  final Supabase _supabase;
  const SupabaseAuthRepository(this._supabase);
  ...
By doing this we have complete control over each dependency. We can for example create a mock implementation of
Supabaseand pass it toSupabaseAuthRepositoryfor testing.
Using injectable we create a @module, which allows to register third party dependencies and inject them using get_it:
import 'package:injectable/injectable.dart';
import 'package:supabase_flutter/supabase_flutter.dart';

@module
abstract class SupabaseModule {
  @lazySingleton
  Supabase supabase() => Supabase.instance;
}injectable will provide the Supabase instance to SupabaseAuthRepository by calling Supabase.instance.
Sign in using Supabase
Here is the core of the article, using Supabase for authentication! Not much to say anyway, since it is just 1 line of code!
In fact, we access auth from Supabase and call signIn by passing email and password.
That's all we need to do. Supabase will take care of the rest, and return the newly created user if the request was successful:
Future<String> signInEmailAndPassword(String email, String password) async {
  final response = await _supabase.client.auth.signIn(
    email: email,
    password: password,
  );

  final userId = response.user?.id;
  if (userId == null) {
    throw UnimplementedError();
  }

  return userId;
}Note: In this example we simply return the
userId.
Sign up using Supabase
The sign up looks exactly the same.
We call the signUp method, passing email and password. It's really that easy!
Future<String> signUpEmailAndPassword(String email, String password) async {
  final response = await _supabase.client.auth.signUp(email, password);

  final userId = response.user?.id;
  if (userId == null) {
    throw UnimplementedError();
  }

  return userId;
}
Sign out using Supabase
Finally, sign out. Easy, just call signOut and supabase will take care of removing the current session.
Future<void> signOut() async {
  await _supabase.client.auth.signOut();
  return;
}
Listen to authentication state changes
The last step is connecting all of this together in our app.
Our goal is to listen for state changes (signed in, signed out, etc.) and push the user to the correct page.
Supabase provides a SupabaseAuth class which gives us a onAuthChange method. This method returns a Stream which notifies us of every change in the authentication state:
import 'package:flutter/material.dart';
import 'package:flutter_supabase_complete/core/routes/app_router.dart';
import 'package:supabase_flutter/supabase_flutter.dart';

/// Entry widget of the app.
class App extends StatefulWidget {
  const App({Key? key}) : super(key: key);

  @override
  State<App> createState() => _AppState();
}

class _AppState extends State<App> {
  final _appRouter = AppRouter();

  @override
  void initState() {
    super.initState();

    /// Listen for authentication events and redirect to
    /// correct page when key events are detected.
    SupabaseAuth.instance.onAuthChange.listen((event) {
      if (event == AuthChangeEvent.signedIn) {
        _appRouter
          ..popUntilRoot()
          ..replace(const HomeRoute());
      } else if (event == AuthChangeEvent.signedOut) {
        _appRouter
          ..popUntilRoot()
          ..replace(const SignInRoute());
      }
    });
  }

  @override
  Widget build(BuildContext context) {
    return MaterialApp.router(
      routerDelegate: _appRouter.delegate(),
      routeInformationParser: _appRouter.defaultRouteParser(),
    );
  }
}Inside the initState in the entry class of our app we use onAuthChange. We call listen on the Stream to get the current authentication state:
- When the user signs in (
AuthChangeEvent.signedIn) we remove all the pages from the stack and we push the user toHomePage - When the user signs out (
AuthChangeEvent.signedOut) we again remove all the pages and we push the user to theSignInPage
/// Listen for authentication events and redirect to
/// correct page when key events are detected.
SupabaseAuth.instance.onAuthChange.listen((event) {
  if (event == AuthChangeEvent.signedIn) {
    _appRouter
      ..popUntilRoot()
      ..replace(const HomeRoute());
  } else if (event == AuthChangeEvent.signedOut) {
    _appRouter
      ..popUntilRoot()
      ..replace(const SignInRoute());
  }
});
By listening to every authentication state change we can always make sure that the user is viewing the correct page (HomePage when logged in, and SignInPage otherwise).
That's it for this tutorial! You now have a complete authentication system available in your app: sign up, sign in, sign out.
That is just the tip of the iceberg. Supabase provides also many more features such as:
- Sign in using third-party providers (Google, Apple, GitHub, Facebook, and more!)
- Password-less authentication
- Email confirmation
- Secure your database based on the user's authentication state (Row level security, policies)
- A dashboard to manage all your users in one place
We are going to explore these topics in the next posts 🔜
If you are interest in learning more about flutter, dart, and supabase you can subscribe to my newsletter here below and follow @SandroMaglione (me 👋) on Twitter.
Thanks for reading.