Setup Typescript with NuxtJs

Sandro Maglione
Get in touch with meWeb development
29 July 2022[updated]
•6 min read
Sandro Maglione
Web development
This article is a note to myself on how to setup typescript on an existing Nuxt js project. It is intended as a quick step-by-step guide on how to get up and running on NuxtJs with full Typescript support.
It took me three days to finally be able to run typescript as I wanted. This is the result.
Resources
1. Create a NuxtJs project
Run the init command to create a new Nuxt project (from here):
npm init nuxt-app <project-name>You can see in the image below the settings that I used to create the project (those are the settings of my existing Nuxt project before I decided to move to typescript).
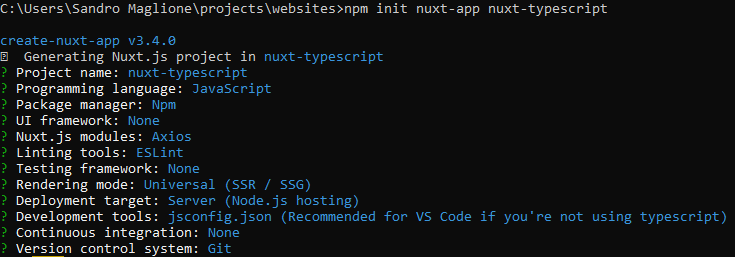
Settings for NuxtJs project. Since the goal is to setup typescript on an existing project, we choose javascript as programming language.
2. Nuxt Typescript
You must have typescript installed, run the command (from here):
npm install typescript --save-devThen you can start installing the Nuxt typescript modules, run the command (from here):
npm install --save-dev @nuxt/typescript-build @nuxt/typesOpen nuxt.config.js and import the build module for typescript support:
export default {
  buildModules: ['@nuxt/typescript-build']
}
Also create a tsconfig.json file in the root of the project for the configuration of typescript:
{
  "compilerOptions": {
    "target": "ES2018",
    "module": "ESNext",
    "moduleResolution": "Node",
    "lib": [
      "ESNext",
      "ESNext.AsyncIterable",
      "DOM"
    ],
    "esModuleInterop": true,
    "allowJs": true,
    "sourceMap": true,
    "strict": true,
    "noEmit": true,
    "baseUrl": ".",
    "paths": {
      "~/*": [
        "./*"
      ],
      "@/*": [
        "./*"
      ]
    },
    "types": [
      "@types/node",
      "@nuxt/types"
    ]
  },
  "exclude": [
    "node_modules"
  ]
}
Create vue-shim.d.ts file in the root of the project to import types for Vue:
declare module "*.vue" {
  import Vue from 'vue'
  export default Vue
}
3. Typescript runtime
Install typescript support for runtime by running this command (from here):
npm install @nuxt/typescript-runtimeThen change your package.json to run typescript commands:
"scripts": {
  "dev": "nuxt-ts",
  "build": "nuxt-ts build",
  "generate": "nuxt-ts generate",
  "start": "nuxt-ts start"
}
4. Linting
Install support for typescript linting using this command (from here):
npm i -D @nuxtjs/eslint-config-typescriptThen add the extension to @nuxtjs/eslint-config-typescript in the .eslintrc.js file. You must remove babel-eslint as a parser in the parserOptions:
module.exports = {
  root: true,
  env: {
    browser: true,
    node: true
  },
  parserOptions: {
    // parser: 'babel-eslint' <- REMOVED
  },
  extends: [
    '@nuxtjs',
    'plugin:nuxt/recommended',
    '@nuxtjs/eslint-config-typescript'
  ],
  plugins: [
  ],
  // add your custom rules here
  rules: {}
}
Add the lint command to the package.json file:
"scripts": {
  "dev": "nuxt-ts",
  "build": "nuxt-ts build",
  "generate": "nuxt-ts generate",
  "start": "nuxt-ts start",
  "lint": "eslint --ext .ts,.js,.vue ." // <- ADD THIS
},
Install also the support for runtime lint by updating the nuxt.config.js file:
export default {
  [...]
  typescript: {
    typeCheck: {
      eslint: {
        files: './**/*.{ts,js,vue}'
      }
    }
  }
}
5. Vuex Typescript support
We use nuxt-typed-vuex to add typing support for Vuex stores.
Start by installing the package by running this command (from here):
npm install nuxt-typed-vuex --saveThen add the module to the nuxt.config.js file under buildModules:
buildModules: [
  'nuxt-typed-vuex',
]
6. Vuex module and typed vuex accessor
In the /store folder create an index.ts file and setup the store for nuxt:
export const state = () => ({})
export const getters = {}
export const mutations = {}
export const actions = {}
Then create a new store module, which is Nuxt is a simple file inside the /store folder. The name of the file represents the corresponding name of the module. For example, create a signIn.ts file inside the /store module.
In order to have types support, we use typed-vuex to create getters, mutations, and actions:
import { getterTree, mutationTree, actionTree } from 'typed-vuex'

export const state = () => ({
  email: '',
  password: ''
})

export const getters = getterTree(state, {
  email: state => state.email,
  password: state => state.password
})

export const mutations = mutationTree(state, {
  SET_EMAIL: (state, value: string): void => {
    state.email = value
  },
  SET_PASSWORD: (state, value: string): void => {
    state.password = value
  }
})

export const actions = actionTree(
  { state, getters, mutations },
  {
    SET_EMAIL ({ commit }, value: string): void {
      commit('SET_EMAIL', value)
    },
    SET_PASSWORD ({ commit }, value: string): void {
      commit('SET_PASSWORD', value)
    }
  }
)
The support for accessors is placed in another file. Create a services folder in the root of the project. Inside create an accessors.ts file and import the module to define the store types:
import { getAccessorType } from 'typed-vuex'
import * as signIn from '@/store/signIn'

const initialStore = () => ({
  modules: {
    signIn
  }
})

export const accessorType = getAccessorType(initialStore())
Finally, create a index.d.ts file in the root of the project in which you define the types for the store:
import { accessorType } from '@/services/accessors'

declare module 'vue/types/vue' {
  interface Vue {
    $accessor: typeof accessorType
  }
}

declare module '@nuxt/types' {
  interface NuxtAppOptions {
    $accessor: typeof accessorType
  }
}
The reason why we define the accessors file outside the /store/index.ts file is to keep separated the file responsible for types from the store.
7. Other types support
In order to add further support for types in the project, we need to add new entries to the types list inside the tsconfig.json file.
For example, to add axios types support, you must install axios by running this command (from here):
npm install @nuxtjs/axiosThen add axios to the modules inside the nuxt.config.js file:
export default {
  modules: ['@nuxtjs/axios']
}
And finally add the module to the types for typescript in the tsconfig.json file:
{
  "compilerOptions": {
    "target": "ES2018",
    "module": "ESNext",
    "moduleResolution": "Node",
    "lib": ["ESNext", "ESNext.AsyncIterable", "DOM"],
    "esModuleInterop": true,
    "allowJs": true,
    "sourceMap": true,
    "strict": true,
    "noEmit": true,
    "baseUrl": ".",
    "paths": {
      "~/*": ["./*"],
      "@/*": ["./*"]
    },
    "types": [
      "@types/node",
      "@nuxt/types", // <- ADD THIS
      "@nuxtjs/axios" // <- ADD THIS
    ]
  },
  "exclude": ["node_modules"]
}
The same procedure works for any other module which has types support for Typescript. Just install the module, add it to the nuxt.config.js file, and then also in the tsconfig.json types list.
Complete
The setup is completed. It is only a matter of managing your types and modules from here. You will notice that now you have typing support in your project.

Complete setup. You now have access to types and autocomplete suggestion inside your project and Vuex store.